矩阵的几何应用-二维变换
1 基本概念
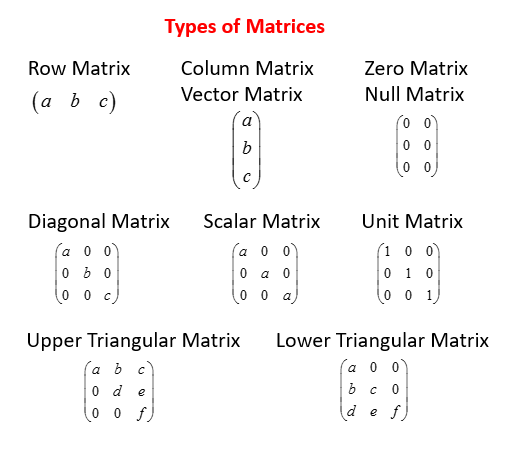
在几何应用中,矩阵是一个非常强大的工具,广泛用于各种变换和操作。以下是矩阵在几何应用中的主要知识点:
1.1 点和向量
在几何中,点和向量可以用矩阵表示。
例如,二维点 (x, y) 可以表示为列向量:
$$\begin{bmatrix} x \\ y \end{bmatrix}$$
1.2 齐次坐标(Homogeneous Coordinate)
1.2.1 定义
齐次坐标是通过在普通坐标后面添加一个额外的维度来表示的,即将一个原本是n维的向量用一个n+1维向量来表示。
例如:二维点 $(x,y)$ 对应的齐次坐标表示为:
$$\begin{bmatrix} x \\ y \\ 1 \end{bmatrix}$$
可以定义成: $(x_h,y_h,h)$
$$\Biggl\{ \begin{matrix}x_h=h\cdot x\\ y_h=h\cdot y\\ h \neq 0 \end{matrix}$$
1.2.2 归一化
齐次坐标 $(x_h,y_h,h)$ 可以通过除以 h 转换回普通坐标 $(x,y)$
一个向量的齐次表示并不是唯一的,齐次坐标的h取不同的值都表示的是同一个点,比如齐次坐标(8,4,2)、(4,2,1)表示的都是二维点(4,2);
1.2.3 齐次坐标的优势
使用齐次坐标可以将平移变换表示为矩阵乘法,从而统一各种几何变换的表示形式。
若将二维点 (x,y) 分别在X和Y轴上平移 (1.5,2.5) 单位,则表示为:
$$\begin{bmatrix}1&0&1.5\\ 0&1&2.5\\ 0&0&1 \end{bmatrix} \cdot \begin{bmatrix}x\\ y\\ 1 \end{bmatrix}$$
为什么需要齐次坐标?
直接使用各个形式不统一的矩阵,会带来很多的不便:
- 由于形式不统一,进行多种变换时,计算量会很大;
- 同时,运算的形式也不统一,平移为相加,旋转缩放为相乘,使用齐次坐标可以将所有变换运算形式保持一致;
- 齐次坐标可以表示无穷远点,这对于投影变换特别重要;
2 基本变换
import matplotlib.pyplot as plt
import numpy as np
import copy
import math
sin = math.sin
cos = math.cos

from matplotlib.gridspec import GridSpec

# 黑暗模式
plt.style.use('dark_background')

# F 图形的齐次坐标
F = np.array([
    [  0,   0, 1],
    [  0,   2, 1],
    [  1,   2, 1],
    [  1, 1.5, 1],
    [0.5, 1.5, 1],
    [0.5,   1, 1],
    [  1,   1, 1],
    [  1, 0.5, 1],
    [0.5, 0.5, 1],
    [0.5,   0, 1],
    [  0,   0, 1]])

# 对 shape 执行变换
def apply(shape,*transforms):
    result = shape.tolist()
    for transform in transforms:
        # 对每一个点(齐次坐标)进行变换
        tmp = []
        for p in result:
            tmp.append(transform @ p)
        result = np.array(tmp)
    # 转化为 np.array 对象
    return np.array(result)

# 展示接口 datas[] = { ax, title, x, y, xlable, ylable, shapes:[] }
def show(*datas):
    for data in datas:
        # 参数
        ax = data['ax']
        x = data['x']
        y = data['y']
        # 设置标题和标签
        if 'title' in data:
            ax.set_title(data['title'])
        if 'xlable' in data:
            ax.set_xlabel(data['xlable'])
        if 'xlable' in data:
            ax.set_ylabel(data['ylable'])
        # 设置x轴和y轴的刻度
        ax.set_xticks(np.arange(math.floor(x[0]),math.ceil(x[1]),x[2]))
        ax.set_yticks(np.arange(math.floor(y[0]),math.ceil(y[1]),y[2]))
        # 设置坐标轴范围
        ax.set_xlim(x[0],x[1])
        ax.set_ylim(y[0],y[1])
        # 绘制x轴和y轴
        ax.axhline(y=0, linewidth=0.6)  # y=0 轴
        ax.axvline(x=0, linewidth=0.6)  # x=0 轴
        # 设置网格
        ax.grid(which='both',linewidth=0.3)
        # 设置坐标轴的纵横比为1,使x轴和y轴的长度一致
        ax.set_aspect('equal', adjustable='box')
        # 绘制
        for shape in data['shapes']:
            # 颜色
            if 'color' in shape:
                color = shape['color']
            else:
                color = 'gray'
            # 线类型
            if 'line' in shape:
                line = shape['line']
            else:
                line = '-'
            # 标签
            if 'lable' in shape:
                lable = shape['lable']
                pos = shape['shape'][lable[0]]
                ax.text(pos[0], pos[1]+0.1, lable[1], color='white', fontsize=lable[2])
            # 绘制
            if 'fill' in shape and shape['fill'] == True:
                ax.fill(
                    shape['shape'][:, 0],
                    shape['shape'][:, 1],
                    color=color)
            else:
                ax.plot(
                    shape['shape'][:, 0],
                    shape['shape'][:, 1],
                    color=color,
                    linestyle=line)
            # 锚点
            if ('noanchor' not in shape) or (shape['noanchor'] != True):
                anchor = shape['shape'][0]
                ax.plot(anchor[0], anchor[1], 'ro')
2.1 平移 (Translation):
将坐标点$(x,y)$平移到$(x+t_x,y+t_y)$,对应的平移矩阵为:
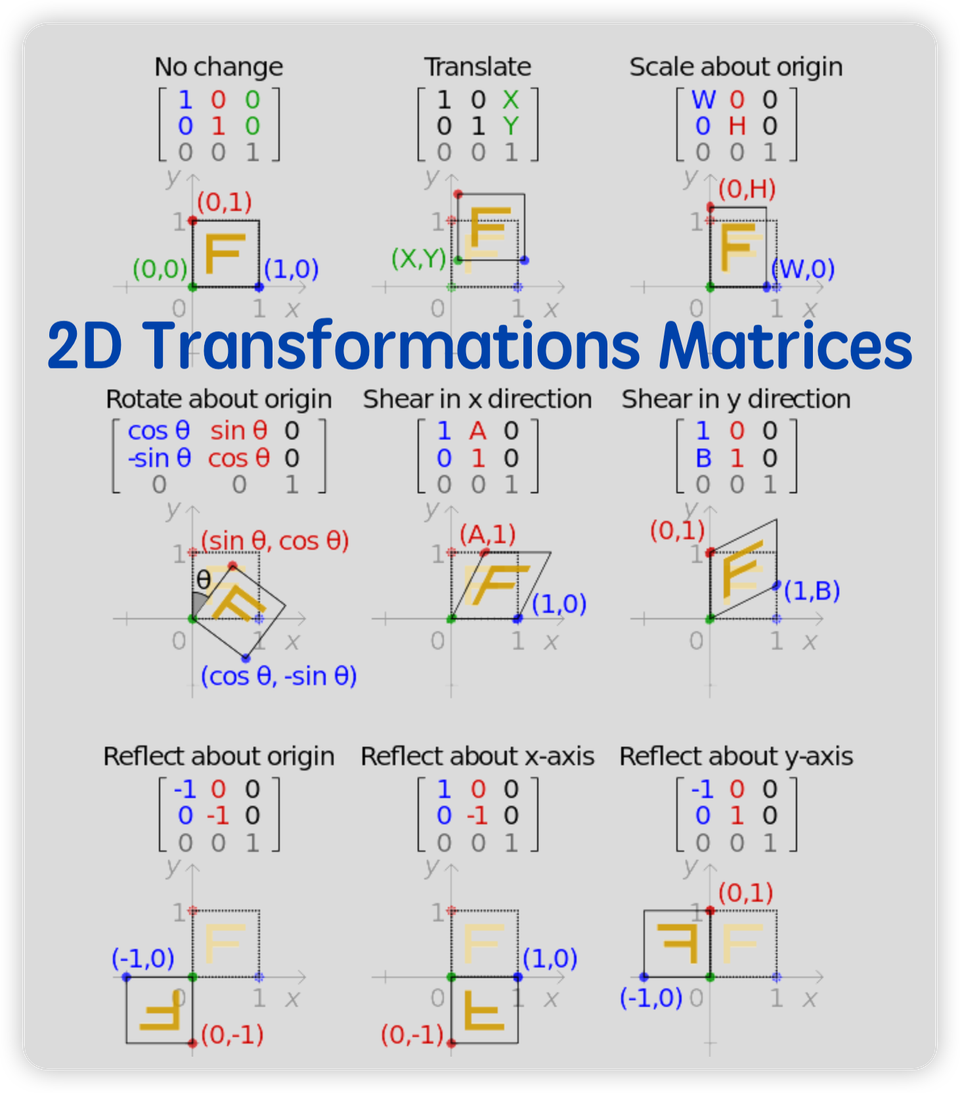
$$\mathbf{T} = \mathbf{T(t_x,t_y)} = \begin{bmatrix}1 & 0 & t_x \\ 0 & 1 & t_y \\ 0 & 0 & 1\end{bmatrix}$$
其中 $t_x$ 和 $t_y$ 是平移量。
逆平移变换矩阵为:
$$\mathbf{T^{-1}} = \mathbf{T(-t_x,-t_y)} = \begin{bmatrix}1&0&-t_x\\ 0&1&-t_y\\ 0&0&1 \end{bmatrix}$$
$$\mathbf{T·T^{-1}}=\begin{bmatrix}1&0&t_x-t_x\\ 0&1&t_y-t_y\\ 0&0&1 \end{bmatrix}=\begin{bmatrix}1&0&0\\ 0&1&0\\ 0&0&1 \end{bmatrix}$$
平移变换具有可加性:
$$\mathbf{T(t_{x2},t_{y2})·T(t_{x1},t_{y1})=T(t_{x1}+t_{x2},t_{y1}+t_{y2})}$$
如果对坐标点 $(x,y)$ 平移 $(t_x,t_y)$,则表示如下:
$$\mathbf{T(t_x,t_y)}\begin{bmatrix}x\\ y\\ 1 \end{bmatrix}=\begin{bmatrix}1&0&t_x\\ 0&1&t_y\\ 0&0&1 \end{bmatrix}\begin{bmatrix}x\\ y\\ 1 \end{bmatrix}=\begin{bmatrix}x+t_x\\ y+t_y\\ 1 \end{bmatrix}$$
fig, ax = plt.subplots(figsize=(6,6))

# 定义一个平移矩阵(x轴上右移0.4,y轴上下移-1.1)
tx,ty = 0.4,-1.1
translation = np.array([
    [1,0,tx],
    [0,1,ty],
    [0,0, 1]])

# 应用变换,并显示
S = apply(F, translation)
show({
    'ax':ax,
    'x':(-2.5, 2.5, 1),
    'y':(-2.5, 2.5, 0.5),
    'xlable':'x',
    'ylable':'y',
    'shapes':[
        {'shape':F,'color':'white','line':'--'},
        {'shape':S,'fill':True},
    ]})
下图为一个在 $(0,0)$ 点的 F 形状,使用平移矩阵相乘,即平移 $(0.4, -1.1)$ 后的表现:

2.2 缩放 (Scaling):
将坐标点$(x,y)$缩放到$(s_xx,s_yy)$,对应的缩放矩阵为:
$$\mathbf{S} = \mathbf{S(s_x,s_y)} = \begin{bmatrix}s_x & 0 & 0 \\ 0 & s_y & 0 \\ 0 & 0 & 1\end{bmatrix}$$
其中 $s_x$ 和 $s_y$ 是缩放因子。
逆缩放变换矩阵为:
$$\mathbf{S^{-1}} = \mathbf{S(\frac{1}{s_x},\frac{1}{s_y})} = \begin{bmatrix}\frac{1}{s_x}&0&0\\ 0&\frac{1}{s_y}&0\\ 0&0&1 \end{bmatrix}$$
$$\mathbf{S·S^{-1}} = \begin{bmatrix}\frac{s_x}{s_x}&0&0\ 0&\frac{s_y}{s_y}&0\\ 0&0&1 \end{bmatrix}=\begin{bmatrix}1&0&0\\ 0&1&0\\ 0&0&1 \end{bmatrix}$$
放缩变换具有可乘性:
$$\mathbf{S(s_{x2},s_{y2})·S(s_{x1},s_{y1})=S(s_{x1}s_{x2},s_{y1}s_{y2})}$$
如果对坐标点 $(x,y)$ 缩放 $(s_x,s_y)$,则表示如下:
$$\mathbf{S_(s_x,s_y)}\begin{bmatrix}x \\ y\\ 1\end{bmatrix}=\begin{bmatrix}s_x&0&0\\ 0&s_y&0\\ 0&0&1 \end{bmatrix} \begin{bmatrix}x\\ y\\ 1 \end{bmatrix}=\begin{bmatrix}s_xx\\ s_yy\\ 1 \end{bmatrix}$$
fig,ax = plt.subplots(1, 2, figsize=(12,14))

# 定义一个缩放矩阵
sx,sy = 1.5,0.7
scaling = np.array([
    [sx, 0, 0],
    [ 0,sy, 0],
    [ 0, 0, 1]])

# 应用变换,并显示
LF = S
LS = apply(LF, scaling)
S = apply(F, scaling)
show({
    'ax':ax[0],
    'x':(-2.5, 2.5, 1),
    'y':(-2.5, 2.5, 0.5),
    'shapes':[
        {'shape':LF,'color':'white','line':'--'},
        {'shape':LS,'fill':True},
    ]},{
    'ax':ax[1],
    'x':(-2.5, 2.5, 1),
    'y':(-2.5, 2.5, 0.5),
    'shapes':[
        {'shape':F,'color':'white','line':'--'},
        {'shape':S,'fill':True},
    ]})
左图为一个在坐标 $(0.4,-1.1)$ 的F图形,直接应用缩放矩阵 $scaling(sx,sy)$ 后的表现;
右图为一个在原点 $(0,0)$ 的F图形,应用缩放矩阵 $scaling(sx,sy)$ 后的表现。

2.3 旋转 (Rotation):
将坐标点$(x,y)$围绕原点 $(0,0)$ 旋转到 $\theta$ 角度,对应的旋转矩阵为:
$$\mathbf{R} = \mathbf{R(\theta)} = \begin{bmatrix} \cos \theta & -\sin \theta & 0 \\ \sin \theta & \cos \theta & 0 \\ 0 & 0 & 1\end{bmatrix}$$
旋转后的点为: $(x·cos\theta-y·sin\theta, x·sin\theta+y·cos\theta)$
逆旋转变换矩阵为:
$$\mathbf{R^{-1}} = \mathbf{R(-\theta)} = \begin{bmatrix}cos\theta&sin\theta&0\\ -sin\theta&cos\theta&0\\ 0&0&1 \end{bmatrix}$$
$$\mathbf{RR^{-1}}=\begin{bmatrix}cos^2\theta+sin^2\theta&cos\theta sin\theta-sin\theta cos\theta&0\\ sin\theta cos\theta-cos\theta sin\theta&sin^2\theta+cos^2\theta&0\\ 0&0&1 \end{bmatrix}=\begin{bmatrix}1&0&0\\ 0&1&0\\ 0&0&1\end{bmatrix}$$
平移和旋转变换具有可加性:
$$\mathbf{R(\theta_2)·R(\theta_1)=R(\theta_1+\theta_2)}$$
如果对坐标点 $(x,y)$ 以$(0,0)$为中心,旋转 $\theta$,则表示如下:
$$\mathbf{R(\theta)}\begin{bmatrix}x\\ y\\ 1 \end{bmatrix}=\begin{bmatrix}cos\theta&-sin\theta&0\\ sin\theta&cos\theta&0\\ 0&0&1 \end{bmatrix}\begin{bmatrix}w\\ y\\ 1 \end{bmatrix}=\begin{bmatrix}x·cos\theta-y·sin\theta\\ x·sin\theta+y·cos\theta\\ 1 \end{bmatrix}$$
fig,ax = plt.subplots(1, 2, figsize=(12,14))

# 定义一个旋转矩阵
θ = math.radians(-45)
roatation = np.array([
    [cos(θ),-sin(θ), 0],
    [sin(θ), cos(θ), 0],
    [     0,      0, 1]])

# 应用变换,并显示
LF = S
LS = apply(LF, roatation)
S = apply(F, roatation)
show({
    'ax':ax[0],
    'x':(-2.5, 2.5, 1), 'y':(-2.5, 2.5, 0.5),
    'shapes':[
        {'shape':LF,'color':'white','line':'--'},
        {'shape':LS,'fill':True},
    ]},{
    'ax':ax[1],
    'x':(-2.5, 2.5, 1), 'y':(-2.5, 2.5, 0.5),
    'shapes':[
        {'shape':F,'color':'white','line':'--'},
        {'shape':S,'fill':True},
    ]})
下图为一个在 $(0,0)$ 点的 F 形状,使用旋转矩阵相乘,即旋转 -45 度后的表现:

2.4 反射 (Reflection):
反射是一种将点映射到对称轴或对称平面另一侧的变换。
反射矩阵是一种特殊的线性变换矩阵,用于将点反射到某个轴或平面上。
反射矩阵的形式取决于反射的轴或平面。
反射矩阵在计算机图形学、物理学和工程学中有广泛的应用。
例如,在计算机图形学中,反射矩阵用于生成镜像效果;在物理学中,反射矩阵用于描述光线或波的反射行为。
通过使用这些反射矩阵,可以方便地对几何图形进行反射变换,从而实现各种复杂的几何操作。
以下是关于矩阵在几何反射中的应用的详细解释:
2.4.1 相对于 x 轴的反射
反射关于x轴的矩阵将点 $(x, y)$ 映射到 $(x, -y)$。
对应的反射矩阵为:
$$\mathbf{R_x} = \begin{bmatrix}1 & 0 & 0 \\ 0 & -1 & 0 \\ 0 & 0 & 1 \end{bmatrix}$$
如果对坐标点 $(x,y)$ 相对于X轴反射,则表示如下:
$$\mathbf{R_x}\begin{bmatrix}x\\ y\\ 1 \end{bmatrix}=\begin{bmatrix}1&0&0\\ 0&-1&0\\ 0&0&1 \end{bmatrix} \begin{bmatrix}x\\ y\\ 1 \end{bmatrix}=\begin{bmatrix}x\\ -y\\ 1 \end{bmatrix}$$
fig,ax = plt.subplots(1, 2, figsize=(12,14))

# 定义一个相对于X轴的反射矩阵
reflectionX = np.array([
    [1, 0, 0],
    [0,-1, 0],
    [0, 0, 1]])

# 应用变换,并显示
LF = S
LS = apply(LF, reflectionX)
S = apply(F, reflectionX)
show({
    'ax':ax[0],
    'x':(-2.5, 2.5, 1), 'y':(-2.5, 2.5, 0.5),
    'shapes':[
        {'shape':LF,'color':'white','line':'--'},
        {'shape':LS,'fill':True},
    ]},{
    'ax':ax[1],
    'x':(-2.5, 2.5, 1), 'y':(-2.5, 2.5, 0.5),
    'shapes':[
        {'shape':F,'color':'white','line':'--'},
        {'shape':S,'fill':True},
    ]})

2.4.2 反射关于y轴
反射关于y轴的矩阵将点 $(x, y)$ 映射到 $(-x, y)$。
对应的反射矩阵为:
$$\mathbf{R_y} = \begin{bmatrix}-1 & 0 & 0 \\ 0 & 1 & 0 \\ 0 & 0 & 1 \end{bmatrix}$$
如果对坐标点 $(x,y)$ 相对于X轴反射,则表示如下:
$$\mathbf{R_y}\begin{bmatrix}x\\ y\\ 1 \end{bmatrix}=\begin{bmatrix}-1&0&0\\ 0&1&0\\ 0&0&1 \end{bmatrix} \begin{bmatrix}x\\ y\\ 1 \end{bmatrix}=\begin{bmatrix}-x\\ y\\ 1 \end{bmatrix}$$
fig,ax = plt.subplots(1, 2, figsize=(12,14))

# 定义一个相对于Y轴的反射矩阵
reflectionY = np.array([
    [-1, 0, 0],
    [ 0, 1, 0],
    [ 0, 0, 1]])

# 应用变换,并显示
LF = S
LS = apply(LF, reflectionY)
S = apply(F, reflectionY)
show({
    'ax':ax[0],
    'x':(-2.5, 2.5, 1),
    'y':(-2.5, 2.5, 0.5),
    'shapes':[
        {'shape':LF,'color':'white','line':'--'},
        {'shape':LS,'fill':True},
    ]},{
    'ax':ax[1],
    'x':(-2.5, 2.5, 1),
    'y':(-2.5, 2.5, 0.5),
    'shapes':[
        {'shape':F,'color':'white','line':'--'},
        {'shape':S,'fill':True},
    ]})

2.4.3 反射关于原点
反射关于原点的矩阵将点 $(x, y)$ 映射到 $(-x, -y)$。
对应的反射矩阵为:
$$\mathbf{R_o} = \begin{bmatrix}-1 & 0 & 0 \\ 0 & -1 & 0 \\ 0 & 0 & 1 \end{bmatrix}$$
如果对坐标点 $(x,y)$ 相对于原点反射,则表示如下:
$$\mathbf{R_o}\begin{bmatrix}x\\ y\\ 1 \end{bmatrix}=\begin{bmatrix}-1&0&0\\ 0&-1&0\\ 0&0&1 \end{bmatrix} \begin{bmatrix}x\\ y\\ 1 \end{bmatrix}=\begin{bmatrix}-x\\ -y\\ 1 \end{bmatrix}$$
fig,ax = plt.subplots(1, 2, figsize=(12,14))

# 定义一个相对于原点的反射矩阵
reflectionO = np.array([
    [-1, 0, 0],
    [ 0,-1, 0],
    [ 0, 0, 1]])

# 应用变换,并显示
LF = S
LS = apply(LF, reflectionO)
S = apply(F, reflectionO)
show({
    'ax':ax[0],
    'x':(-2.5, 2.5, 1),
    'y':(-2.5, 2.5, 0.5),
    'shapes':[
        {'shape':LF,'color':'white','line':'--'},
        {'shape':LS,'fill':True},
    ]},{
    'ax':ax[1],
    'x':(-2.5, 2.5, 1),
    'y':(-2.5, 2.5, 0.5),
    'shapes':[
        {'shape':F,'color':'white','line':'--'},
        {'shape':S,'fill':True},
    ]})

2.4.4 反射关于y = x
反射关于直线 $y = x$ 的矩阵将点 $(x, y)$ 映射到 $(y, x)$。
对应的反射矩阵为:
$$\mathbf{R_{y=x}} = \begin{bmatrix}0 & 1 & 0 \\ 1 & 0 & 0 \\ 0 & 0 & 1\end{bmatrix}$$
如果对坐标点 $(x,y)$ 相对于$x=y$反射,则表示如下:
$$\mathbf{R_{y=x}}\begin{bmatrix}x\\ y\\ 1 \end{bmatrix}=\begin{bmatrix}0&1&0\\ 1&0&0\\ 0&0&1 \end{bmatrix} \begin{bmatrix}x\\ y\\ 1 \end{bmatrix}=\begin{bmatrix}y\\ x\\ 1 \end{bmatrix}$$
fig,ax = plt.subplots(1, 2, figsize=(12,14))

# 定义一个相对于y=x的反射矩阵
reflectionYX = np.array([
    [ 0, 1, 0],
    [ 1, 0, 0],
    [ 0, 0, 1]])

# 应用变换,并显示
LF = S
LS = apply(LF, reflectionYX)
S = apply(F, reflectionYX)
show({
    'ax':ax[0],
    'x':(-2.5, 2.5, 1),
    'y':(-2.5, 2.5, 0.5),
    'shapes':[
        {'shape':LF,'color':'white','line':'--'},
        {'shape':LS,'fill':True},
    ]},{
    'ax':ax[1],
    'x':(-2.5, 2.5, 1),
    'y':(-2.5, 2.5, 0.5),
    'shapes':[
        {'shape':F,'color':'white','line':'--'},
        {'shape':S,'fill':True},
    ]})

2.4.5 反射关于任意直线
对于反射关于任意直线 $y = mx + c$,我们需要进行以下步骤:
-
平移:将直线平移到通过原点的位置。
$$\mathbf{T} = \mathbf{T(0,-c)} = \begin{bmatrix}1&0&0 \\ 0&1&-c \\ 0&0&1 \end{bmatrix}$$ -
旋转:将直线旋转到与x轴对齐的位置。
假设直线的斜率为 $m$,则旋转角度 $\theta$ 满足 $\tan(\theta) = m$。
$$\mathbf{R} = \mathbf{R(-\theta)} = \begin{bmatrix} \cos(-\theta) & -\sin(-\theta) & 0\\ \sin(-\theta) & \cos(-\theta) & 0\\ 0&0&1\end{bmatrix} = \begin{bmatrix}\cos(\theta) & \sin(\theta) & 0\\ -\sin(\theta) & \cos(\theta) & 0\\ 0&0&1\end{bmatrix}$$
-
反射:使用反射关于x轴的矩阵。
$$\mathbf{R_x} = \begin{bmatrix}1 & 0 & 0 \\ 0 & -1 & 0 \\ 0 & 0 & 1\end{bmatrix}$$ -
逆旋转:将直线旋转回原来的角度。
$$\mathbf{R^{-1}} = \mathbf{R(\theta)} = \begin{bmatrix}\cos(\theta) & -\sin(\theta) & 0 \\ \sin(\theta) & \cos(\theta) & 0 \\ 0 & 0 & 1 \end{bmatrix}$$ -
逆平移:将直线平移回原来的位置。
$$\mathbf{T^{-1}} = \mathbf{T(0,c)} = \begin{bmatrix}1&0&0 \\ 0&1&c \\ 0&0&1\end{bmatrix}$$
反射关于任意直线的矩阵 $R_{line}$ 可以表示为:
$$\mathbf{R_{line}} = \mathbf{T^{-1}} \cdot \mathbf{R(-\theta)} \cdot \mathbf{R_x} \cdot \mathbf{R(\theta)} \cdot \mathbf{T}$$
如果对坐标点 $(x,y)$ 相对于原点反射,则表示如下:
$$\mathbf{R_{line}}\begin{bmatrix}x\\ y\\ 1 \end{bmatrix}$$
$$=\begin{bmatrix}1&0&0\\ 0&1&c\\ 0&0&1\end{bmatrix}\begin{bmatrix}\cos(\theta)&-\sin(\theta)&0\\ \sin(\theta)&\cos(\theta)&0\\ 0&0&1\end{bmatrix}\begin{bmatrix}1&0&0\\ 0&-1&0\\ 0&0&1 \end{bmatrix}\begin{bmatrix}\cos(\theta)&\sin(\theta)&0\\ -\sin(\theta)&\cos(\theta)&0\\ 0&0&1\end{bmatrix}\begin{bmatrix}1&0&0\\ 0&1&-c\\ 0&0&1\end{bmatrix} \cdot \begin{bmatrix}x\\ y\\ 1\end{bmatrix}$$
$$=\begin{bmatrix}\cos(2\theta)&\sin(2\theta)&-c\sin(2\theta)\\ \sin(2\theta)&-\cos(2\theta)&c(1+\cos2\theta)\\ 0&0&1\end{bmatrix} \cdot \begin{bmatrix}x\\ y\\ 1\end{bmatrix}$$
$$=\frac{1}{1+m^2} \cdot \begin{bmatrix}1-m^2&2m&-2mc\\ 2m&m^2-1&2c\\ 0&0&1+m^2\end{bmatrix} \cdot \begin{bmatrix}x\\ y\\ 1\end{bmatrix}$$
fig,ax = plt.subplots(3, 2, figsize=(12,17))

# 直线 y = mx + c
m,c = 1.5,0.5
x = np.linspace(-5, 5, 10)
y = m*x + c
ax[2][1].plot(x, y, '--')
ax[2][1].text(-0.7, -0.7*m+c, f"  y={m}x + {c}", color="yellow", fontsize=12)

# 定义各个分解步骤的变换矩阵
θ = math.atan(m)
r = np.array([
    [ cos(θ), sin(θ), 0],
    [-sin(θ), cos(θ), 0],
    [      0,      0, 1]])
ri = np.array([
    [ cos(θ),-sin(θ), 0],
    [ sin(θ), cos(θ), 0],
    [      0,      0, 1]])
t = np.array([
    [1, 0, 0],
    [0, 1,-c],
    [0, 0, 1]])
ti = np.array([
    [1, 0, 0],
    [0, 1, c],
    [0, 0, 1]])
rx = np.array([
    [1, 0, 0],
    [0,-1, 0],
    [0, 0, 1]])

# 按步骤顺序进行变换
# 1.平移到原点
S1 = apply(F, t)
# 2.旋转到与X轴对齐
S2 = apply(S1, r)
# 3. 以x轴反射
S3 = apply(S2, rx)
# 4. 逆旋转
S4 = apply(S3, ri)
# 5. 逆平移
S5 = apply(S4, ti)

# 采用连续变换矩阵计算
S = apply(F, np.array([
    [cos(2*θ),  sin(2*θ),    -c*sin(2*θ)],
    [sin(2*θ), -cos(2*θ), c*(1+cos(2*θ))],
    [       0,         0,              1]]))

# 显示
show({
    'ax':ax[0][0],
    'title':'(1) Translation',
    'x':(-1, 2.5, 1), 'y':(-1, 2.5, 0.5),
    'shapes':[
        {'shape':F,'color':'white','line':'--'},
        {'shape':S1,'fill':True},
    ]},{
    'ax':ax[0][1],
    'title':'(2) Rotation',
    'x':(-1, 2.5, 1), 'y':(-1, 2.5, 0.5),
    'shapes':[
        {'shape':S1,'color':'white','line':'--'},
        {'shape':S2,'fill':True},
    ]},{
    'ax':ax[1][0],
    'title':'(3) Reflection-X',
    'x':(-1, 2.5, 1), 'y':(-1, 2.5, 0.5),
    'shapes':[
        {'shape':S2,'color':'white','line':'--'},
        {'shape':S3,'fill':True},
    ]},{
    'ax':ax[1][1],
    'title':'(4) Inverse Rotation',
    'x':(-1, 2.5, 1), 'y':(-1, 2.5, 0.5),
    'shapes':[
        {'shape':S3,'color':'white','line':'--'},
        {'shape':S4,'fill':True},
    ]},{
    'ax':ax[2][0],
    'title':'(5) Inverse Translation',
    'x':(-1, 2.5, 1), 'y':(-1, 2.5, 0.5),
    'shapes':[
        {'shape':S4,'color':'white','line':'--'},
        {'shape':S5,'fill':True},
    ]},{
    'ax':ax[2][1],
    'title':'(6) Result',
    'x':(-1, 2.5, 1), 'y':(-1, 2.5, 0.5),
    'shapes':[
        {'shape':F,'color':'white','line':'--'},
        {'shape':S,'fill':True},
    ]})

# 调整子图间的间距
#plt.subplots_adjust(left=0.1, right=0.7, top=0.7, bottom=0.1, hspace=0.5, wspace=0)
plt.tight_layout()

2.5. 剪切 (Shearing):
在二维几何变换中,剪切(Shear)变换是一种将图形沿某个方向拉伸或压缩的操作。它可以分为水平剪切和垂直剪切。
$$\mathbf{H} = \mathbf{H(sh_x,sh_y)} = \begin{bmatrix}1 & sh_x & 0 \\ sh_y & 1 & 0 \\ 0 & 0 & 1\end{bmatrix}$$
其中 $sh_x$ 和 $sh_y$ 是剪切因子。
逆剪切变换矩阵为:
$$\mathbf{H^{-1}} = \mathbf{H(-sh_x,-sh_y)} = \begin{bmatrix}1 & -sh_x & 0 \\ -sh_y & 1 & 0 \\ 0 & 0 & 1\end{bmatrix}$$
$$\mathbf{HH^{-1}}=\begin{bmatrix}1-sh_x\cdot sh_y & 0 & 0 \\ 0 & 1-sh_x\cdot sh_y & 0 \\ 0&0&1 \end{bmatrix}$$
逆剪切变换后,原点在x轴和y轴上同时被缩放了 $1-sh_x\cdot sh_y$ 倍,需要再对其进行逆缩放变换 $S(\frac{1}{1-sh_x\cdot sh_y}, \frac{1}{1-sh_x\cdot sh_y})$。
剪切变换可以分为水平剪切和垂直剪切。以下是剪切变换的应用及其矩阵表示:
2.5.1 水平剪切(Horizontal Shear)
水平剪切变换会将图形沿 x 轴方向拉伸或压缩,而 y 轴方向保持不变。其变换矩阵如下:
$$\mathbf{H(sh_x,0)} = \begin{bmatrix}1 & sh_x & 0\\ 0 & 1 & 0\\ 0 & 0 & 1\end{bmatrix}$$
其中,$ sh_x $ 是水平剪切系数。
如果 $ sh_x > 0 $,图形会向右剪切;
如果 $ sh_x < 0 $,图形会向左剪切。
如果对坐标点 $(x,y)$ ,经过水平剪切变换后的新坐标 $(x + sh_x \cdot y,y)$,则表示如下:
$$\mathbf{H(sh_x,0)}\begin{bmatrix}x\\ y\\ 1 \end{bmatrix}=\begin{bmatrix}1&sh_x&0\\ 0&1&0\\ 0&0&1 \end{bmatrix}\begin{bmatrix}x\\ y\\ 1 \end{bmatrix}=\begin{bmatrix}x + sh_x \cdot y\\ y\\ 1 \end{bmatrix}$$
fig,ax = plt.subplots(1, 2, figsize=(12,14))
shx1,shx2 = 0.6,-0.6

# 定义水平剪切矩阵
shearH1 = np.array([
    [1,shx1, 0],
    [0,   1, 0],
    [0,   0, 1]])
shearH2 = np.array([
    [1,shx2, 0],
    [0,   1, 0],
    [0,   0, 1]])

# 应用变换,并显示
S1 = apply(F, shearH1)
S2 = apply(F, shearH2)
show({
    'ax':ax[0],
    'x':(-1.5, 2, 1), 'y':(-1, 2.5, 0.5),
    'shapes':[
        {'shape':F,'color':'white','line':'--'},
        {'shape':S1,'fill':True},
    ]},{
    'ax':ax[1],
    'x':(-1.5, 2, 1), 'y':(-1, 2.5, 0.5),
    'shapes':[
        {'shape':F,'color':'white','line':'--'},
        {'shape':S2,'fill':True},
    ]})

2.5.2 垂直剪切(Vertical Shear)
垂直剪切变换会将图形沿 y 轴方向拉伸或压缩,而 x 轴方向保持不变。其变换矩阵如下:
$$\mathbf{H(0,sh_y)} = \begin{bmatrix}1 & 0 & 0\\ sh_y & 1 & 0\\ 0 & 0 & 1\end{bmatrix}$$
其中,$ sh_y $ 是垂直剪切系数。
如果 $ sh_y > 0 $,图形会向上剪切;
如果 $ sh_y < 0 $,图形会向下剪切。
如果对坐标点 $(x,y)$ ,经过垂直剪切变换后的新坐标 $(x,y + sh_y \cdot x)$,则表示如下:
$$\mathbf{H(0,sh_y)}\begin{bmatrix}x\\ y\\ 1 \end{bmatrix}=\begin{bmatrix}1&0&0\\ sh_y&1&0\\ 0&0&1 \end{bmatrix}\begin{bmatrix}x\\ y\\ 1 \end{bmatrix}=\begin{bmatrix}x\\ y + sh_y \cdot x\\ 1 \end{bmatrix}$$
fig,ax = plt.subplots(1, 2, figsize=(12,14))
shy1,shy2 = 0.6,-0.6

# 定义垂直剪切矩阵
shearV1 = np.array([
    [   1, 0, 0],
    [shy1, 1, 0],
    [   0, 0, 1]])
shearV2 = np.array([
    [   1, 0, 0],
    [shy2, 1, 0],
    [   0, 0, 1]])

# 应用变换,并显示
S1 = apply(F, shearV1)
S2 = apply(F, shearV2)
show({
    'ax':ax[0],
    'x':(-1.5, 2, 1), 'y':(-1, 3, 0.5),
    'shapes':[
        {'shape':F,'color':'white','line':'--'},
        {'shape':S1,'fill':True},
    ]},{
    'ax':ax[1],
    'x':(-1.5, 2, 1), 'y':(-1, 3, 0.5),
    'shapes':[
        {'shape':F,'color':'white','line':'--'},
        {'shape':S2,'fill':True},
    ]})

3 逆变换(Inverse Transformation)
在计算机图形学和线性代数中是一个重要概念,主要用于撤销或还原变换。
3.1 定义
逆变换是指找到一个变换,使得应用该变换后能够恢复到原始状态。对于一个变换矩阵 $ M $,其逆矩阵 $ M^{-1} $ 满足 $ M \cdot M^{-1} = I $,其中 $ I $ 是单位矩阵。
3.2 性质
- 逆矩阵的逆矩阵是原矩阵本身,即 $ (M{-1}){-1} = M $。
- 逆矩阵的转置是转置矩阵的逆,即 $ (M{-1})T = (MT){-1} $。
- 矩阵乘法的逆矩阵是各矩阵逆矩阵的乘积,且顺序相反,即 $ (AB)^{-1} = B{-1}A{-1} $。
3.3 存在性
- 只有当矩阵是非奇异矩阵(即行列式不为零)时,逆矩阵才存在。
3.4 计算方法(二维变换)
3.4.1 平移变换的逆变换
$$\mathbf{T^{-1}} = \mathbf{T(-t_x,-t_y)} = \begin{bmatrix}1&0&-t_x\\ 0&1&-t_y\\ 0&0&1 \end{bmatrix}$$
$$\mathbf{T·T^{-1}}=\begin{bmatrix}1&0&t_x-t_x\\ 0&1&t_y-t_y\\ 0&0&1 \end{bmatrix}=\begin{bmatrix}1&0&0\\ 0&1&0\\ 0&0&1 \end{bmatrix}$$
fig,ax = plt.subplots(1, 2, figsize=(12,14))
t_x,t_y = 1.4,0.7

# 定义一个平移矩阵,及其逆矩阵
translation = np.array([
    [ 1, 0, t_x],
    [ 0, 1, t_y],
    [ 0, 0,   1]])
translation_i = np.array([
    [ 1, 0,-t_x],
    [ 0, 1,-t_y],
    [ 0, 0,   1]])

# 应用变换,并显示
S1 = apply(F, translation)
S2 = apply(S1, translation_i)
show({
    'ax':ax[0],
    'title':'Translation',
    'x':(-1, 3, 1), 'y':(-1, 3, 0.5),
    'shapes':[
        {'shape':F,'color':'white','line':'--'},
        {'shape':S1,'fill':True},
    ]},{
    'ax':ax[1],
    'title':'Translation Inverse',
    'x':(-1, 3, 1), 'y':(-1, 3, 0.5),
    'shapes':[
        {'shape':S1,'color':'white','line':'--'},
        {'shape':S2,'fill':True},
    ]})

3.4.2 缩放变换的逆变换
$$\mathbf{S^{-1}} = \mathbf{S(\frac{1}{s_x},\frac{1}{s_y})} = \begin{bmatrix}\frac{1}{s_x}&0&0\\ 0&\frac{1}{s_y}&0\\ 0&0&1 \end{bmatrix}$$
$$\mathbf{S·S^{-1}} = \begin{bmatrix}\frac{s_x}{s_x}&0&0\\ 0&\frac{s_y}{s_y}&0\\ 0&0&1 \end{bmatrix}=\begin{bmatrix}1&0&0\\ 0&1&0\\ 0&0&1 \end{bmatrix}$$
fig,ax = plt.subplots(1, 2, figsize=(12,14))
sx,sy = 1.5,-0.3

# 定义一个缩放矩阵,及其逆矩阵
scaling = np.array([
    [  sx,   0, 0],
    [   0,  sy, 0],
    [   0,   0, 1]])
scaling_i = np.array([
    [1/sx,   0, 0],
    [   0,1/sy, 0],
    [   0,   0, 1]])

# 应用变换,并显示
S1 = apply(F, scaling)
S2 = apply(S1, scaling_i)
show({
    'ax':ax[0],
    'title':'Scaling',
    'x':(-1, 3, 1), 'y':(-1, 3, 0.5),
    'shapes':[
        {'shape':F,'color':'white','line':'--'},
        {'shape':S1,'fill':True},
    ]},{
    'ax':ax[1],
    'title':'Scaling Inverse',
    'x':(-1, 3, 1), 'y':(-1, 3, 0.5),
    'shapes':[
        {'shape':S1,'color':'white','line':'--'},
        {'shape':S2,'fill':True},
    ]})

3.4.3 旋转变换的逆变换(逆时针旋转 θ 角度)
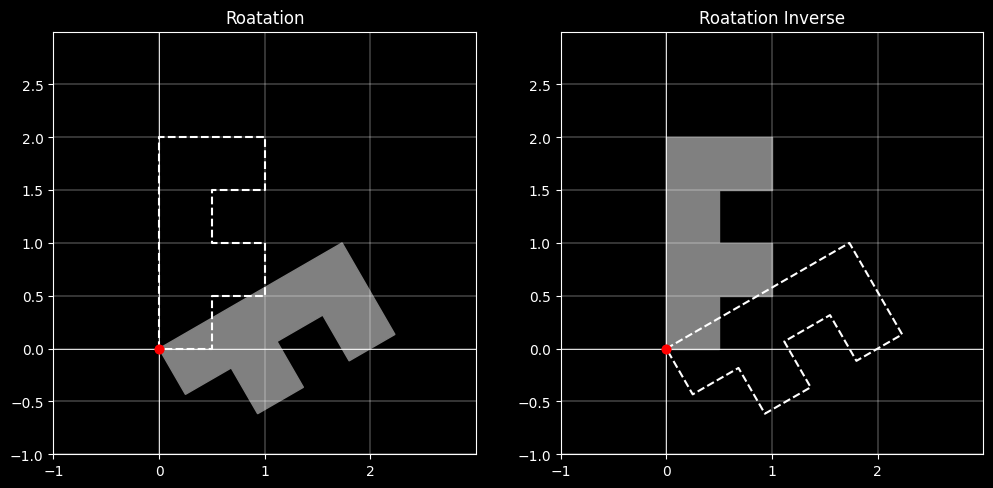
$$\mathbf{R^{-1}} = \mathbf{R(-\theta)} = \begin{bmatrix}cos\theta&sin\theta&0\\ -sin\theta&cos\theta&0\\ 0&0&1 \end{bmatrix}$$
$$\mathbf{RR^{-1}}=\begin{bmatrix}cos^2\theta+sin^2\theta&cos\theta sin\theta-sin\theta cos\theta&0\\ sin\theta cos\theta-cos\theta sin\theta&sin^2\theta+cos^2\theta&0\\ 0&0&1 \end{bmatrix}=\begin{bmatrix}1&0&0\\ 0&1&0\\ 0&0&1 \end{bmatrix}$$
fig,ax = plt.subplots(1, 2, figsize=(12,14))

# 定义一个缩放矩阵,及其逆矩阵
θ = math.radians(-60)
roatation = np.array([
    [ cos(θ),-sin(θ), 0],
    [ sin(θ), cos(θ), 0],
    [      0,      0, 1]])
roatation_i = np.array([
    [ cos(θ), sin(θ), 0],
    [-sin(θ), cos(θ), 0],
    [     0,       0, 1]])

# 应用变换
S1 = apply(F, roatation)
S2 = apply(S1, roatation_i)
show({
    'ax':ax[0],
    'title':'Roatation',
    'x':(-1, 3, 1), 'y':(-1, 3, 0.5),
    'shapes':[
        {'shape':F,'color':'white','line':'--'},
        {'shape':S1,'fill':True},
    ]},{
    'ax':ax[1],
    'title':'Roatation Inverse',
    'x':(-1, 3, 1), 'y':(-1, 3, 0.5),
    'shapes':[
        {'shape':S1,'color':'white','line':'--'},
        {'shape':S2,'fill':True},
    ]})
3.4.4 剪切变换的逆变换
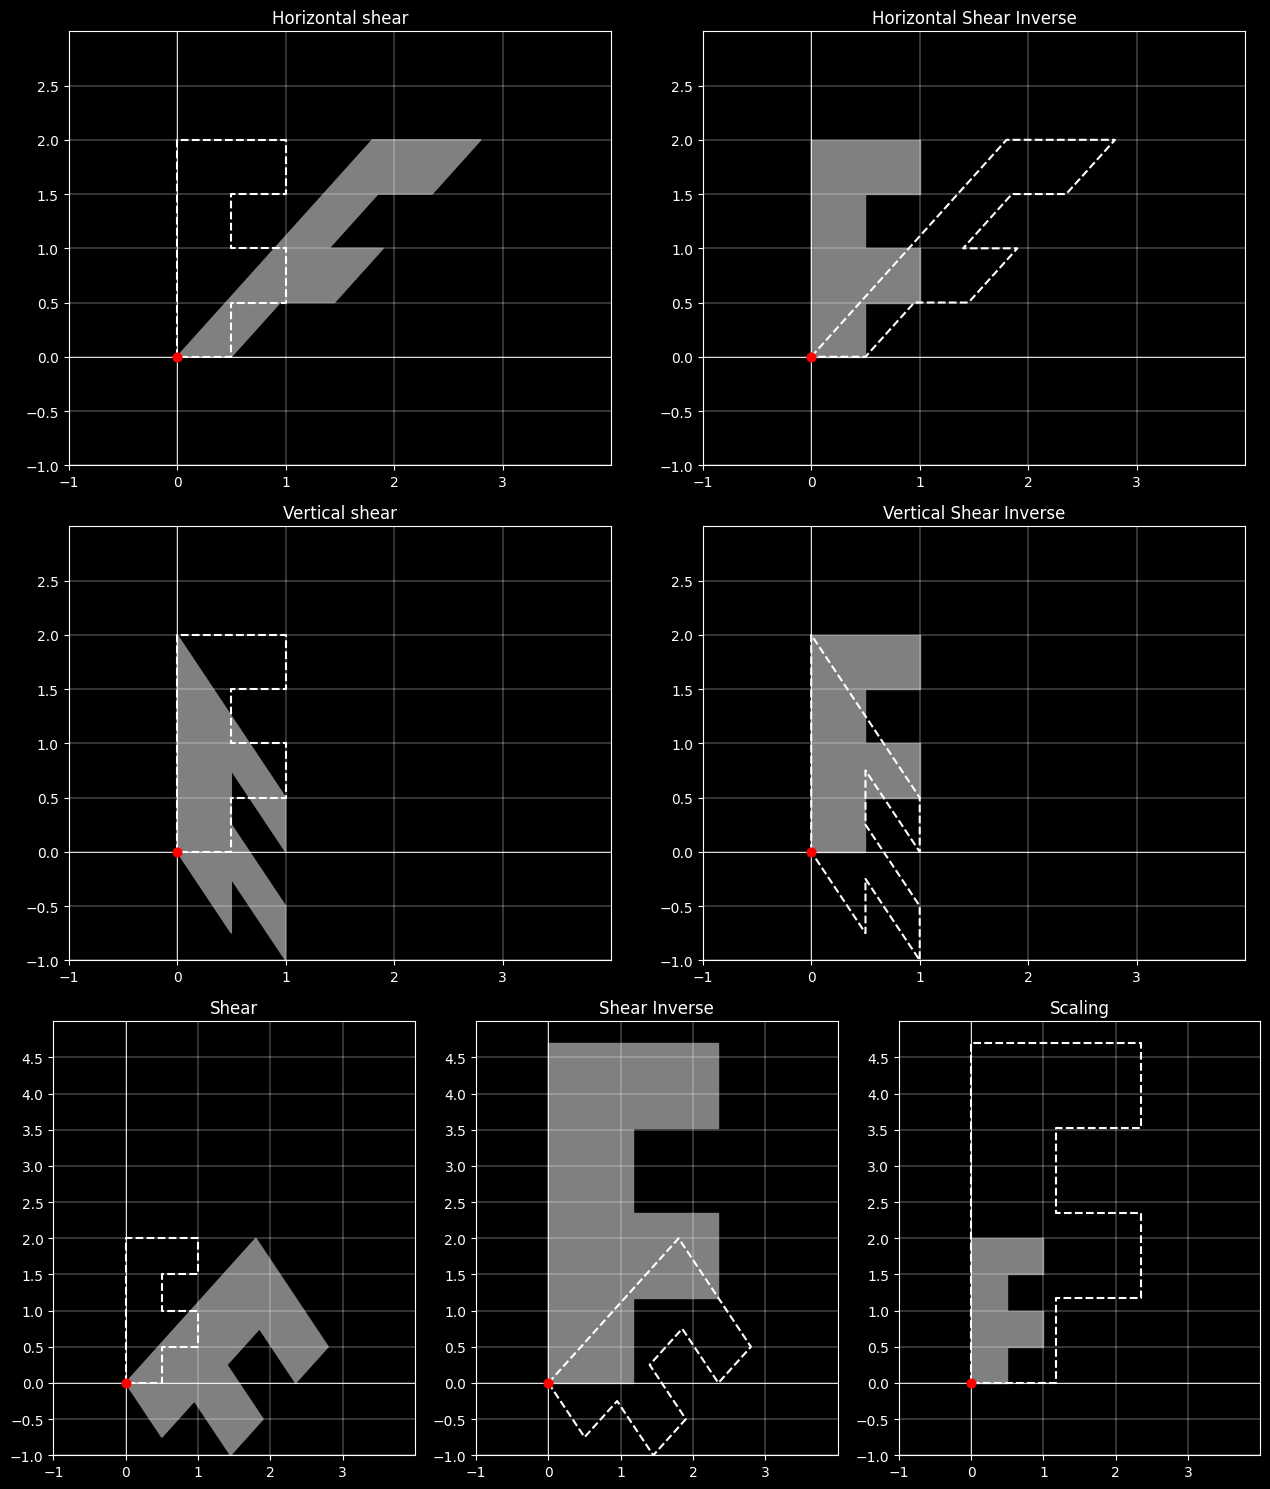
$$\mathbf{H^{-1}} = \mathbf{H(-sh_x,-sh_y)} = \begin{bmatrix}1 & -sh_x & 0 \\ -sh_y & 1 & 0 \\ 0 & 0 & 1\end{bmatrix}$$
$$\mathbf{HH^{-1}}=\begin{bmatrix}1-sh_x\cdot sh_y & 0 & 0 \\ 0 & 1-sh_x\cdot sh_y & 0 \\ 0&0&1 \end{bmatrix}$$
逆剪切变换后,原点在x轴和y轴上同时被缩放了 $1-sh_x\cdot sh_y$ 倍,需要再对其进行逆缩放变换 $S(\frac{1}{1-sh_x\cdot sh_y}, \frac{1}{1-sh_x\cdot sh_y})$。
$$\mathbf{S(\frac{1}{1-sh_x\cdot sh_y}, \frac{1}{1-sh_x\cdot sh_y})} \cdot \begin{bmatrix}1-sh_x\cdot sh_y & 0 & 0 \\ 0 & 1-sh_x\cdot sh_y & 0 \\ 0&0&1 \end{bmatrix}$$
$$=\begin{bmatrix}1&0&0\\ 0&1&0\\ 0&0&1 \end{bmatrix}$$
# 剪切因子
shx,shy = 0.9,-1.5

# 只应用水平上的剪切
shearH = np.array([
    [1, shx, 0],
    [0,   1, 0],
    [0,   0, 1]])
shearH_i = np.array([
    [1,-shx, 0],
    [0,   1, 0],
    [0,   0, 1]])
S1 = apply(F, shearH)
S2 = apply(S1, shearH_i)

# 定义一个垂直剪切矩阵
shearV = np.array([
    [   1, 0, 0],
    [ shy, 1, 0],
    [   0, 0, 1]])
shearV_i = np.array([
    [   1, 0, 0],
    [-shy, 1, 0],
    [   0, 0, 1]])
S3 = apply(F, shearV)
S4 = apply(S3, shearV_i)

# 定义一个剪切矩阵,其逆矩阵,及缩放矩阵
shear = np.array([
    [   1, shx, 0],
    [ shy,   1, 0],
    [   0,   0, 1]])
shear_i = np.array([
    [   1,-shx, 0],
    [-shy,   1, 0],
    [   0,   0, 1]])
scale = 1/(1-shx*shy)
scaling = np.array([
    [scale,    0, 0],
    [    0,scale, 0],
    [    0,    0, 1]])
S5 = apply(F, shear)
S6 = apply(S5, shear_i)
S7 = apply(S6, scaling)

# 创建图形和 GridSpec 对象
fig = plt.figure(figsize=(13,15))
gs = GridSpec(3, 6, figure=fig)
ax1 = fig.add_subplot(gs[0, :3])
ax2 = fig.add_subplot(gs[0, -3:])
ax3 = fig.add_subplot(gs[1, :3])
ax4 = fig.add_subplot(gs[1, -3:])
ax5 = fig.add_subplot(gs[2, 0:2])
ax6 = fig.add_subplot(gs[2, 2:4])
ax7 = fig.add_subplot(gs[2, 4:6])

# 显示
show({
    'ax':ax1,
    'title':'Horizontal shear',
    'x':(-1, 4, 1), 'y':(-1, 3, 0.5),
    'shapes':[
        {'shape':F,'color':'white','line':'--'},
        {'shape':S1,'fill':True},
    ]},{
    'ax':ax2,
    'title':'Horizontal Shear Inverse',
    'x':(-1, 4, 1), 'y':(-1, 3, 0.5),
    'shapes':[
        {'shape':S1,'color':'white','line':'--'},
        {'shape':S2,'fill':True},
    ]},{
    'ax':ax3,
    'title':'Vertical shear',
    'x':(-1, 4, 1), 'y':(-1, 3, 0.5),
    'shapes':[
        {'shape':F,'color':'white','line':'--'},
        {'shape':S3,'fill':True},
    ]},{
    'ax':ax4,
    'title':'Vertical Shear Inverse',
    'x':(-1, 4, 1), 'y':(-1, 3, 0.5),
    'shapes':[
        {'shape':S3,'color':'white','line':'--'},
        {'shape':S4,'fill':True},
    ]},{
    'ax':ax5,
    'title':'Shear',
    'x':(-1, 4, 1), 'y':(-1, 5, 0.5),
    'shapes':[
        {'shape':F,'color':'white','line':'--'},
        {'shape':S5,'fill':True},
    ]},{
    'ax':ax6,
    'title':'Shear Inverse',
    'x':(-1, 4, 1), 'y':(-1, 5, 0.5),
    'shapes':[
        {'shape':S5,'color':'white','line':'--'},
        {'shape':S6,'fill':True},
    ]},{
    'ax':ax7,
    'title':'Scaling',
    'x':(-1, 4, 1), 'y':(-1, 5, 0.5),
    'shapes':[
        {'shape':S6,'color':'white','line':'--'},
        {'shape':S7,'fill':True},
    ]})
plt.tight_layout()
#plt.subplots_adjust(left=0.1, right=0.5, top=0.7, bottom=0.1, hspace=0.5, wspace=0.2)
4 复合变换
4.1 组合变换
多个变换可以通过矩阵乘法组合在一起。例如,先旋转再平移的变换可以表示为 $T \cdot R$。
变换合成时,矩阵相乘的顺序:先作用的放在乘法组合的右端,后作用的放在乘法组合的左端;
连续变换时,先计算变换矩阵,再计算坐标;
- 优点1:提高了对图形依次做多次变换的运算效率
如:图形上有n个顶点 $Pi$,如果依次施加的变换为 $T$(先平移),$R$(后旋转),那么顶点$Pi$ 变换后的坐标为:
$\qquad\mathbf{P'_i=R(\theta)·T(t_x,t_y)·P_i}$
$\qquad\mathbf{P'_i=(R(\theta)·T(t_x,t_y))·P_i=T·P_i}$
- 优点2:能构造复杂的变换矩阵
对图形作较复杂的变换时,不直接去计算这个变换,而是将其先分解成多个基本变换,再合成总的变换。
多个变换的组合,可通过单个变换矩阵来计算矩阵乘积;
4.2 连续变换
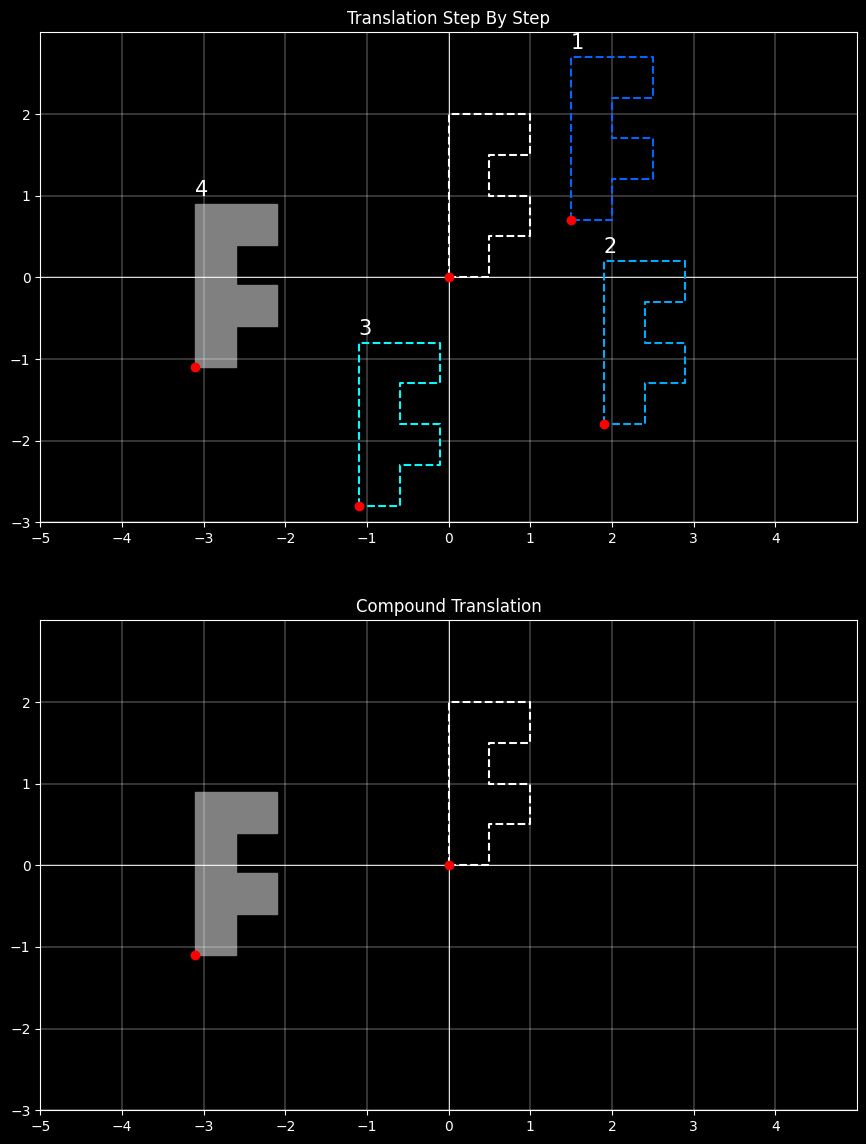
4.2.1 连续平移
平移向量为 $(t_{1x},t_{1y})$ 和 $(t_{2x},t_{2y})$,点 $P$ 经变换为$P´$,则有:
$$\mathbf{P'=T(t_{2x},t_{2y})\cdot \{T(t_{1x},t_{1y})\cdot P\}=\{T(t_{2x},t_{2y})\cdot T(t_{1x},t_{1y})\}·P}$$
$$\mathbf{T(t_{2x},t_{2y})\cdot T(t_{1x},t_{1y})}$$
$$= \begin{bmatrix}1&0&t_{2x}\\ 0&1&t_{2y}\\ 0&0&1 \end{bmatrix} \cdot \begin{bmatrix}1&0&t_{1x}\\ 0&1&t_{1y}\\ 0&0&1 \end{bmatrix}$$
$$=\begin{bmatrix}1&0&t_{1x}+t_{2x}\\ 0&1&t_{1y}+t_{2y}\\ 0&0&1 \end{bmatrix}$$
$$=\mathbf{T(t_{1x}+t_{2x},t_{1y}+t_{2y})}$$
# 定义连续平移矩阵,即一个复合矩阵
translation1 = np.array([
    [1,0, 1.5],
    [0,1, 0.7],
    [0,0,   1]])
translation2 = np.array([
    [1,0, 0.4],
    [0,1,-2.5],
    [0,0,   1]])
translation3 = np.array([
    [1,0,  -3],
    [0,1,  -1],
    [0,0,   1]])
translation4 = np.array([
    [1,0,  -2],
    [0,1, 1.7],
    [0,0,   1]])
compoundTranslation = translation4 @ translation3 @ translation2 @ translation1

S1 = apply(F, translation1)
S2 = apply(S1, translation2)
S3 = apply(S2, translation3)
S4 = apply(S3, translation4)
S = apply(F, compoundTranslation)

# 显示
fig,ax = plt.subplots(2, 1, figsize=(12,14))
show({
    'ax':ax[0],
    'title':'Translation Step By Step',
    'x':(-5, 5, 1), 'y':(-3, 3, 1),
    'shapes':[
        {'shape':F,'color':'white','line':'--'},
        {'shape':S1,'color':'#0066FF','line':'--','lable':(1,"1",15)},
        {'shape':S2,'color':'#00AAFF','line':'--','lable':(1,"2",15)},
        {'shape':S3,'color':'#00FFFF','line':'--','lable':(1,"3",15)},
        {'shape':S4,'fill':True,'lable':(1,"4",15)},
    ]},{
    'ax':ax[1],
    'title':'Compound Translation',
    'x':(-5, 5, 1), 'y':(-3, 3, 1),
    'shapes':[
        {'shape':F,'color':'white','line':'--'},
        {'shape':S,'fill':True},
    ]})
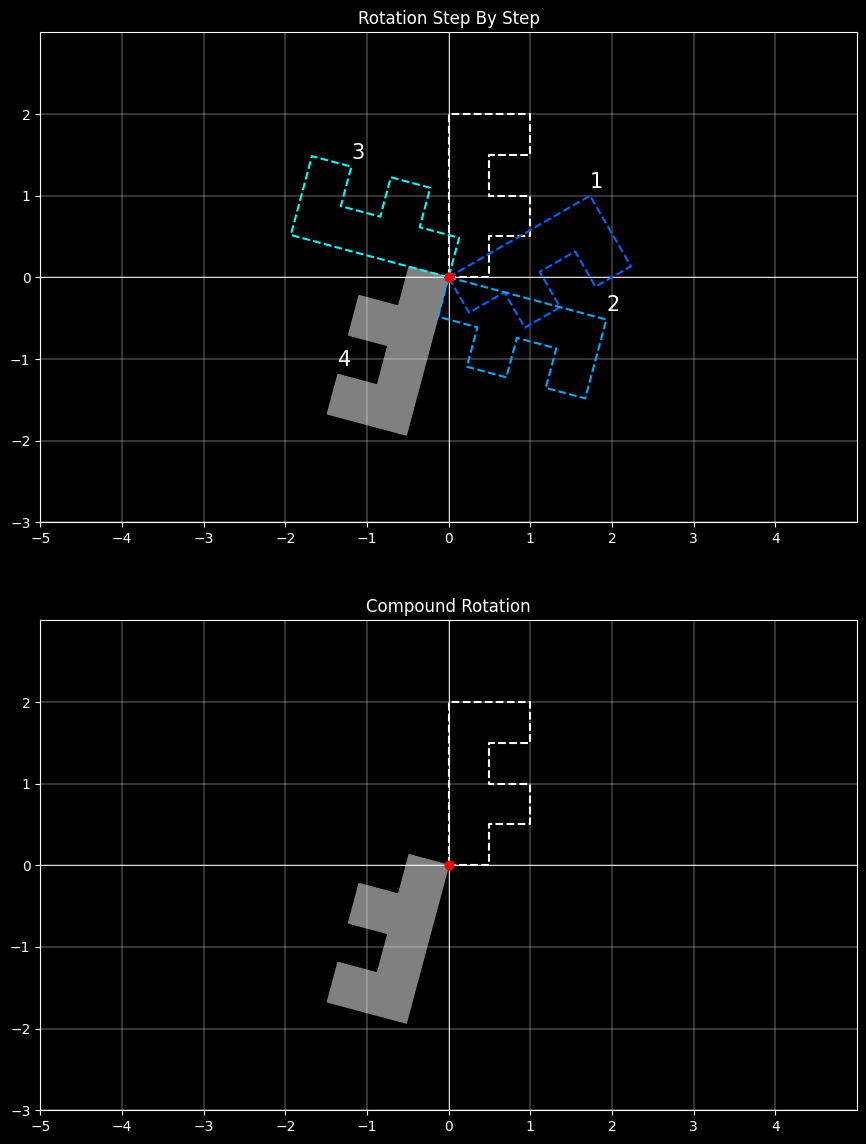
4.2.2 连续旋转
P 经连续旋转角度分别为 $\theta_1$ 和 $\theta_2$ 后:
$$\mathbf{P'=R(θ_2) \cdot {R(θ_1) \cdot P}=\{R(θ_2) \cdot R(θ_1)\} \cdot P}$$
$$\mathbf{R(θ_2) \cdot R(θ_1)}$$
$$= \begin{bmatrix}cos\theta_2&-sin\theta_2&0\\ sin\theta_2&cos\theta_2&0\\ 0&0&1 \end{bmatrix} \cdot \begin{bmatrix}cos\theta_1&-sin\theta_1&0\\ sin\theta_1&cos\theta_1&0\\ 0&0&1 \end{bmatrix}$$
$$= \begin{bmatrix}cos(\theta_1+\theta_2)&-sin(\theta_1+\theta_2)&0\\ sin(\theta_1+\theta_2)&cos(\theta_1+\theta_2)&0\\ 0&0&1 \end{bmatrix}$$
$$=\mathbf{R(\theta_1+\theta_2)}$$
# 定义连续旋转矩阵,即一个复合矩阵
θ = math.radians(-60)
roatation1 = np.array([
    [cos(θ),-sin(θ), 0],
    [sin(θ), cos(θ), 0],
    [     0,      0, 1]])
θ = math.radians(-45)
roatation2 = np.array([
    [cos(θ),-sin(θ), 0],
    [sin(θ), cos(θ), 0],
    [     0,      0, 1]])
θ = math.radians(180)
roatation3 = np.array([
    [cos(θ),-sin(θ), 0],
    [sin(θ), cos(θ), 0],
    [     0,      0, 1]])
θ = math.radians(-270)
roatation4 = np.array([
    [cos(θ),-sin(θ), 0],
    [sin(θ), cos(θ), 0],
    [     0,      0, 1]])
compoundRoatation = roatation4 @ roatation3 @ roatation2 @ roatation1

S1 = apply(F, roatation1)
S2 = apply(S1, roatation2)
S3 = apply(S2, roatation3)
S4 = apply(S3, roatation4)
S = apply(F, compoundRoatation)

# 显示
fig,ax = plt.subplots(2, 1, figsize=(12,14))
show({
    'ax':ax[0],
    'title':'Rotation Step By Step',
    'x':(-5, 5, 1), 'y':(-3, 3, 1),
    'shapes':[
        {'shape':F,'color':'white','line':'--'},
        {'shape':S1,'color':'#0066FF','line':'--','lable':(1,"1",15)},
        {'shape':S2,'color':'#00AAFF','line':'--','lable':(1,"2",15)},
        {'shape':S3,'color':'#00FFFF','line':'--','lable':(3,"3",15)},
        {'shape':S4,'fill':True,'lable':(3,"4",15)},
    ]},{
    'ax':ax[1],
    'title':'Compound Rotation',
    'x':(-5, 5, 1), 'y':(-3, 3, 1),
    'shapes':[
        {'shape':F,'color':'white','line':'--'},
        {'shape':S,'fill':True},
    ]})
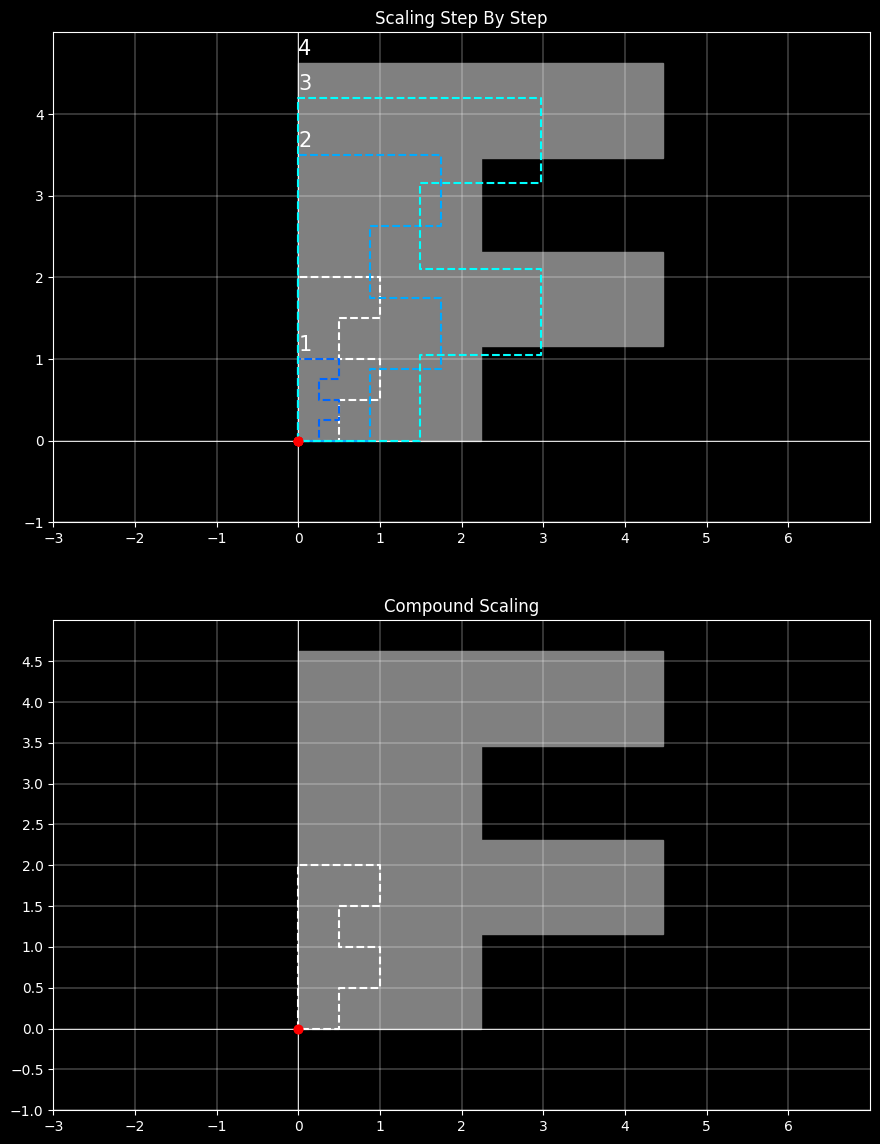
4.2.3 连续缩放
连续放缩因子分别为(s1x, s1y) 和 (s2x, s2y)后:
$$\mathbf{P'=S(s_{2x},s_{2y})\cdot \{S(s_{1x},s_{1y})\cdot P\}=\{S(s_{2x},s_{2y})\cdot S(s_{1x},s_{1y})\}·P}$$
$$\mathbf{S(s_{2x},s_{2y}) \cdot S(s_{1x},s_{1y})}$$
$$= \begin{bmatrix}s_{2x}&0&0\\ 0&s_{2y}&0\\ 0&0&1 \end{bmatrix} \cdot \begin{bmatrix}s_{1x}&0&0\\ 0&s_{1y}&0\\ 0&0&1 \end{bmatrix}$$
$$= \begin{bmatrix}s_{1x} \cdot s_{2x}&0&0\\ 0&s_{1y} \cdot s_{2y}&0\\ 0&0&1 \end{bmatrix}$$
$$= S(s_{1x} \cdot s_{2x},s_{1y} \cdot s_{2y})$$
# 定义连续缩放矩阵,即一个复合矩阵
scaling1 = np.array([
    [ 0.5,   0, 0],
    [   0, 0.5, 0],
    [   0,   0, 1]])
scaling2 = np.array([
    [ 3.5,   0, 0],
    [   0, 3.5, 0],
    [   0,   0, 1]])
scaling3 = np.array([
    [ 1.7,   0, 0],
    [   0, 1.2, 0],
    [   0,   0, 1]])
scaling4 = np.array([
    [ 1.5,   0, 0],
    [   0, 1.1, 0],
    [   0,   0, 1]])
compoundScaling = scaling4 @ scaling3 @ scaling2 @ scaling1

S1 = apply(F, scaling1)
S2 = apply(S1, scaling2)
S3 = apply(S2, scaling3)
S4 = apply(S3, scaling4)
S = apply(F, compoundScaling)

# 显示
fig,ax = plt.subplots(2, 1, figsize=(12,14))
show({
    'ax':ax[0],
    'title':'Scaling Step By Step',
    'x':(-3, 7, 1), 'y':(-1, 5, 1),
    'shapes':[
        {'shape':F,'color':'white','line':'--'},
        {'shape':S1,'color':'#0066FF','line':'--','lable':(1,"1",15)},
        {'shape':S2,'color':'#00AAFF','line':'--','lable':(1,"2",15)},
        {'shape':S3,'color':'#00FFFF','line':'--','lable':(1,"3",15)},
        {'shape':S4,'fill':True,'lable':(1,"4",15)},
    ]},{
    'ax':ax[1],
    'title':'Compound Scaling',
    'x':(-3, 7, 1), 'y':(-1, 5, 0.5),
    'shapes':[
        {'shape':F,'color':'white','line':'--'},
        {'shape':S,'fill':True},
    ]})
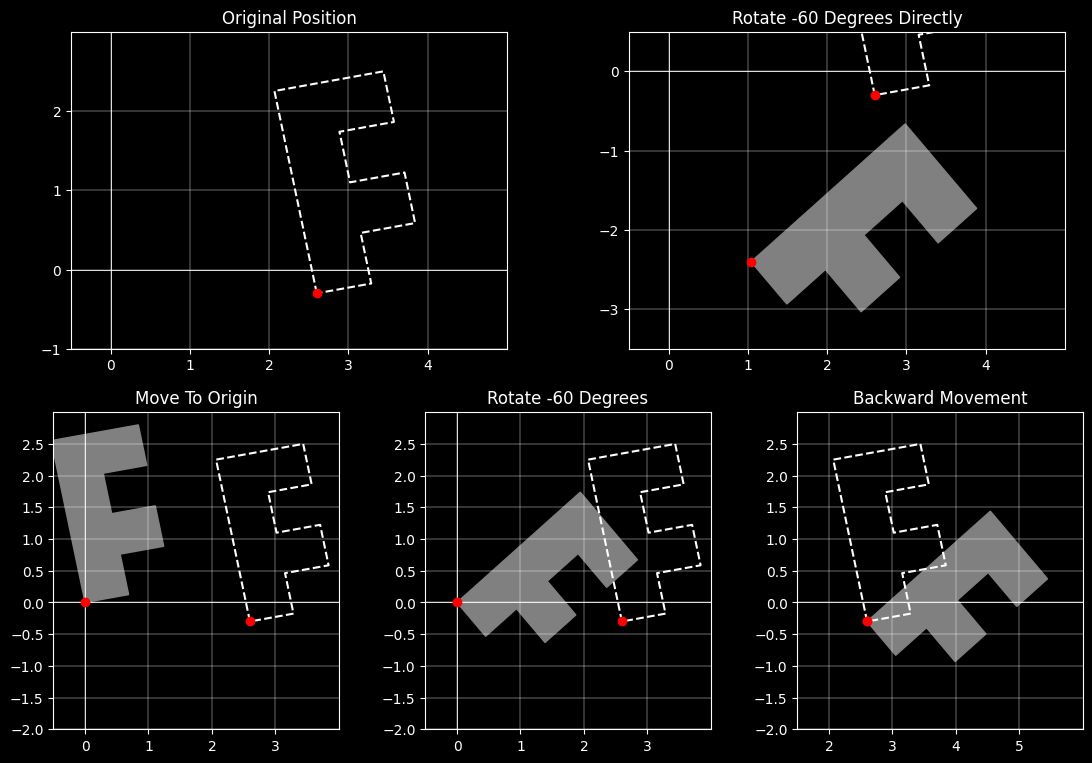
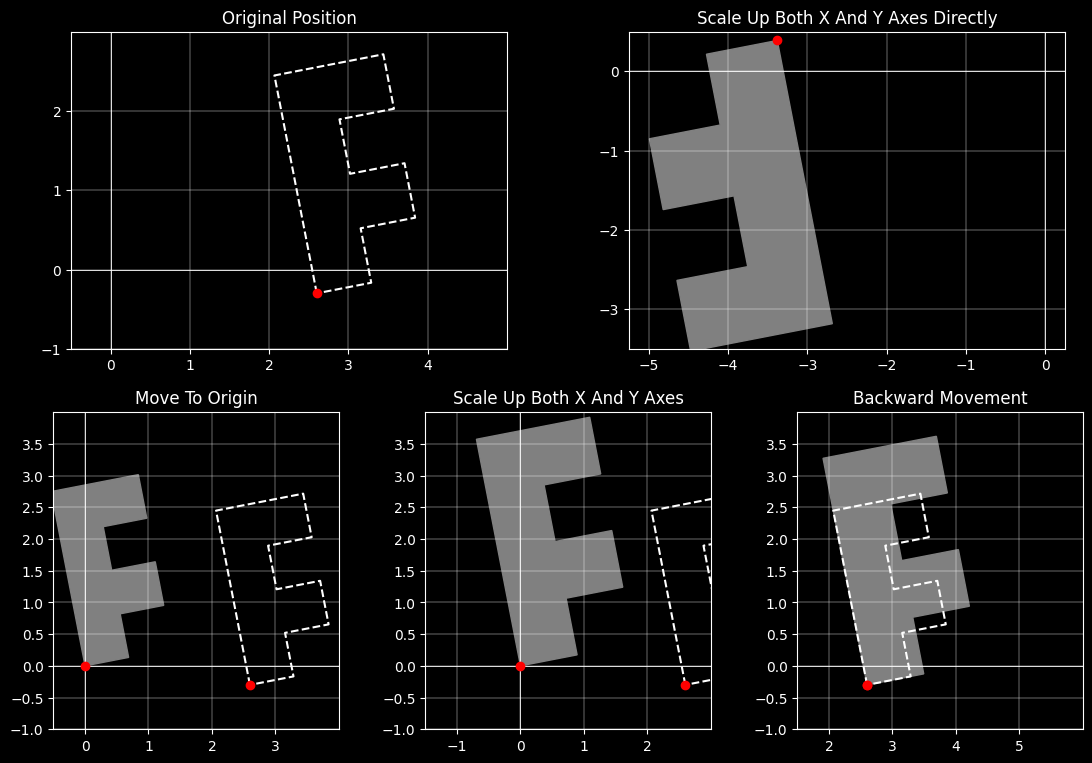
4.2.4 基于任意参照点的二维变换
任意点的旋转变换
步骤:
- 平移对象使参照(基准)点移到原点
- 绕坐标原点旋转
- 平移对象使基准点回到原始位置
其组成的复合矩阵为:
$$\mathbf{R(x_r,y_r;\theta)}$$
$$=T(x_r,y_r)·R(\theta)·T(-x_r,-y_r)$$
$$=\begin{bmatrix}1&0&x_r\\ 0&1&y_r\\ 0&0&1 \end{bmatrix}\begin{bmatrix}cos\theta&-sin\theta&0\\ sin\theta&cos\theta&0\\ 0&0&1 \end{bmatrix}\begin{bmatrix}1&0&-x_r\\ 0&1&-y_r\\ 0&0&1 \end{bmatrix}$$
$$=\begin{bmatrix}cos\theta&-sin\theta&x_r(1-cos\theta)+y_rsin\theta\\ sin\theta&cos\theta&y_r(1-cos\theta)-x_rsin\theta\\ 0&0&1 \end{bmatrix}$$
# 创建图形和 GridSpec 对象
fig = plt.figure(figsize=(14,14))
gs = GridSpec(3, 6, figure=fig)
ax1 = fig.add_subplot(gs[0, :3])
ax2 = fig.add_subplot(gs[0, -3:])
ax3 = fig.add_subplot(gs[1, 0:2])
ax4 = fig.add_subplot(gs[1, 2:4])
ax5 = fig.add_subplot(gs[1, 4:6])

# 初始位置
x,y = 2.6,-0.3
θ = math.radians(11)
S = apply(F,np.array([[cos(θ),-sin(θ),    0],
                      [sin(θ), cos(θ),    0],
                      [     0,      0,    1]]),
            np.array([[   1.4,      0,    0],
                      [     0,    1.3,    0],
                      [     0,      0,    1]]),
            np.array([[     1,      0,    x],
                      [     0,      1,    y],
                      [     0,      0,    1]]))

# Move To Origin
S1 = apply(S,np.array([[    1,      0,   -x],
                       [    0,      1,   -y],
                       [    0,      0,    1]]))

# Rotate {degrees} Degrees
degrees = -60
θ = math.radians(degrees)
S2 = apply(S1,np.array([[cos(θ),-sin(θ),    0],
                        [sin(θ), cos(θ),    0],
                        [     0,      0,    1]]))

# Backward Movement
S3 = apply(S2,np.array([[     1,      0,    x],
                        [     0,      1,    y],
                        [     0,      0,    1]]))

# Rotate {degrees} Degrees Directly
SS = apply(S,np.array([[cos(θ),-sin(θ),    0],
                       [sin(θ), cos(θ),    0],
                       [     0,      0,    1]]))

show({
    'ax':ax1,
    'title':'Original Position',
    'x':(-0.5, 5, 1), 'y':(-1, 3, 1),
    'shapes':[
        {'shape':S,'color':'white','line':'--'},
    ]},{
    'ax':ax2,
    'title':f'Rotate {degrees} Degrees Directly',
    'x':(-0.5, 5, 1), 'y':(-3.5, 0.5, 1),
    'shapes':[
        {'shape':S,'color':'white','line':'--'},
        {'shape':SS,'fill':True},
    ]},{
    'ax':ax3,
    'title':'Move To Origin',
    'x':(-0.5, 4, 1), 'y':(-2, 3, 0.5),
    'shapes':[
        {'shape':S,'color':'white','line':'--'},
        {'shape':S1,'fill':True},
    ]},{
    'ax':ax4,
    'title':f'Rotate {degrees} Degrees',
    'x':(-0.5, 4, 1), 'y':(-2, 3, 0.5),
    'shapes':[
        {'shape':S,'color':'white','line':'--'},
        {'shape':S2,'fill':True},
    ]},{
    'ax':ax5,
    'title':'Backward Movement',
    'x':(1.5, 6, 1), 'y':(-2, 3, 0.5),
    'shapes':[
        {'shape':S,'color':'white','line':'--'},
        {'shape':S3,'fill':True},
    ]})
任意点的缩放变换
步骤:
- 平移对象使基准点与坐标原点重合
- 缩放变换
- 反向平移使得基准点回到初始位置
其组成的复合矩阵为:
$$\mathbf{S(x_r,y_r;s_x,s_y)}$$
$$ =T(x_r,y_r) \cdot S(s_x,s_y) \cdot T(-x_r,-y_r)$$
$$=\begin{bmatrix}1&0&x_r\\ 0&1&y_r\\ 0&0&1 \end{bmatrix}\begin{bmatrix}s_x&0&0\\ 0&s_y&0\\ 0&0&1 \end{bmatrix}\begin{bmatrix}1&0&-x_r\\ 0&1&-y_r\\ 0&0&1 \end{bmatrix}$$
$$ =\begin{bmatrix}s_x&0&x_r(1-s_x)\\ 0&s_y&y_r(1-s_y)\\ 0&0&1 \end{bmatrix}$$
# 创建图形和 GridSpec 对象
fig = plt.figure(figsize=(14,14))
gs = GridSpec(3, 6, figure=fig)
ax1 = fig.add_subplot(gs[0, :3])
ax2 = fig.add_subplot(gs[0, -3:])
ax3 = fig.add_subplot(gs[1, 0:2])
ax4 = fig.add_subplot(gs[1, 2:4])
ax5 = fig.add_subplot(gs[1, 4:6])

# 初始位置
θ = math.radians(11)
S = apply(F,np.array([[cos(θ),-sin(θ),    0],
                      [sin(θ), cos(θ),    0],
                      [     0,      0,    1]]),
            np.array([[   1.4,      0,    0],
                      [     0,    1.4,    0],
                      [     0,      0,    1]]),
            np.array([[     1,      0,  2.6],
                      [     0,      1, -0.3],
                      [     0,      0,    1]]))

# Move To Origin
S1 = apply(S,np.array([[    1,      0,   -x],
                       [    0,      1,   -y],
                       [    0,      0,    1]]))

# Scale Up 1.3 Times Both X And Y Axes
sx,sy = 1.3,1.3
S2 = apply(S1,np.array([[    sx,      0,    0],
                        [     0,     sy,    0],
                        [     0,      0,    1]]))

# Backward Movement
S3 = apply(S2,np.array([[     1,      0,    x],
                        [     0,      1,    y],
                        [     0,      0,    1]]))

# Scale Up 1.3 Times Both X And Y Axes Directly
SS = apply(S,np.array([[   -sx,      0,    0],
                       [     0,    -sy,    0],
                       [     0,      0,    1]]))

show({
    'ax':ax1,
    'title':'Original Position',
    'x':(-0.5, 5, 1), 'y':(-1, 3, 1),
    'shapes':[
        {'shape':S,'color':'white','line':'--'},
    ]},{
    'ax':ax2,
    'title':f'Scale Up Both X And Y Axes Directly',
    'x':(-5.25, 0.25, 1), 'y':(-3.5, 0.5, 1),
    'shapes':[
        {'shape':S,'color':'white','line':'--'},
        {'shape':SS,'fill':True},
    ]},{
    'ax':ax3,
    'title':'Move To Origin',
    'x':(-0.5, 4, 1), 'y':(-1, 4, 0.5),
    'shapes':[
        {'shape':S,'color':'white','line':'--'},
        {'shape':S1,'fill':True},
    ]},{
    'ax':ax4,
    'title':f'Scale Up Both X And Y Axes',
    'x':(-1.5, 3, 1), 'y':(-1, 4, 0.5),
    'shapes':[
        {'shape':S,'color':'white','line':'--'},
        {'shape':S2,'fill':True},
    ]},{
    'ax':ax5,
    'title':'Backward Movement',
    'x':(1.5, 6, 1), 'y':(-1, 4, 0.5),
    'shapes':[
        {'shape':S,'color':'white','line':'--'},
        {'shape':S3,'fill':True},
    ]})
5 在2D游戏坐标系中的简单应用
在二维游戏开发中,理解世界坐标和本地坐标是非常重要的。这两种坐标系统帮助开发者控制和放置游戏中的对象,如角色、道具和场景元素等。下面我将详细解释这两种坐标系统:
# 定义一个精灵类 Sprite ,用表示在二维坐标系中的各种变换。
class Sprite:
    def __init__(self,shape,color='white',line='--',fill=False) -> None:
        self.parent:Sprite = None
        self.childs = []
        self.ref = shape
        self.color = color
        self.line = line
        self.fill = fill
        self.angle = 0
        self.translation = np.array([[1,0,0],[0,1,0],[0,0,1]],dtype=float)
        self.rotation = np.array([[1,0,0],[0,1,0],[0,0,1]],dtype=float)
        self.scaling = np.array([[1,0,0],[0,1,0],[0,0,1]],dtype=float)

    def copy(self,color=None,line=None,fill=None):
        new = copy.deepcopy(self)
        new.color = color if color is not None else self.color
        new.line = line if line is not None else self.line
        new.fill = fill if fill is not None else self.fill
        return new

    def add_child(self, child):
        if isinstance(child,Sprite):
            self.childs.append(child)
            child.parent = self

    def set_pos(self, x, y):
        """ 设置本地坐标 """
        self.translation[0][2] = x
        self.translation[1][2] = y
        return self

    def set_angle(self, angle):
        """ 设置本地旋转角度 """
        self.angle = angle
        θ = math.radians(self.angle)
        self.rotation[0][0],self.rotation[0][1] = cos(θ),-sin(θ)
        self.rotation[1][0],self.rotation[1][1] = sin(θ), cos(θ)
        return self

    def set_scale(self, sx, sy):
        """ 设置本地缩放 """
        self.scaling[0][0] = sx
        self.scaling[1][1] = sy
        return self

    def move(self, x, y):
        """ 移动(基于本地坐标系) """
        self.translation[0][2] += x
        self.translation[1][2] += y
        return self

    def rotate(self, angle):
        """ 旋转(基于本地坐标系) """
        self.angle += angle
        θ = math.radians(self.angle)
        self.rotation[0][0],self.rotation[0][1] = cos(θ),-sin(θ)
        self.rotation[1][0],self.rotation[1][1] = sin(θ), cos(θ)
        return self

    def scale(self, sx, sy):
        """ 缩放(基于本地坐标系) """
        self.scaling[0][0] *= sx
        self.scaling[1][1] *= sy
        return self

    def to_global(self, local_pos):
        """ 将本地坐标转化为基于世界坐标系的坐标 """
        local_pos = self.translation @ self.rotation @ self.scaling @ local_pos
        if self.parent is not None:
            local_pos = self.parent.to_global(local_pos)
        return local_pos

    def to_local(self, global_pos):
        """ 将世界坐标转化为基于本地坐标系的坐标 """
        if self.parent is not None:
            global_pos = self.parent.to_local(global_pos)
        inv = np.linalg.inv
        global_pos = inv(self.scaling) @ inv(self.rotation) @ inv(self.translation) @ global_pos
        return global_pos

    def set_global_pos(self, x, y):
        """ 设置全局坐标 """
        if self.parent is None:
            self.translation[0][2] = x
            self.translation[1][2] = y
        else:
            local = self.parent.to_local(np.array([x,y,1]))
            self.translation[0][2] = local[0]
            self.translation[1][2] = local[1]
        return self

    def move_global(self, x, y):
        """ 基于全局坐标系的移动 """
        if self.parent is None:
            self.translation[0][2] += x
            self.translation[1][2] += y
        else:
            pos = self.to_global(np.array([0,0,1]))
            pos[0] += x
            pos[1] += y
            local = self.parent.to_local(pos)
            self.translation[0][2] = local[0]
            self.translation[1][2] = local[1]
        return self

    def draw_coord(self):
        self.coord = [
            np.array([[-0.2,2.3,1],[0,2.5,1],[0.2,2.3,1],[0,2.5,1],[0,0,1]],dtype=float),
            np.array([[2.3,-0.2,1],[2.5,0,1],[2.3,0.2,1],[2.5,0,1],[0,0,1]],dtype=float)]
        return self

    def draw(self,ax,color=None,line=None,fill=None):
        # 先应用本地变换
        self.shape = apply(self.ref, self.scaling, self.rotation, self.translation)
        if hasattr(self,'coord'):
            self.coordY = apply(self.coord[0], self.scaling, self.rotation, self.translation)
            self.coordX = apply(self.coord[1], self.scaling, self.rotation, self.translation)
        # 紧接着引用父节点变换
        parent = self.parent
        while parent is not None:
            self.shape = apply(self.shape, parent.scaling, parent.rotation, parent.translation)
            if hasattr(self,'coord'):
                self.coordY = apply(self.coordY, parent.scaling, parent.rotation, parent.translation)
                self.coordX = apply(self.coordX, parent.scaling, parent.rotation, parent.translation)
            parent = parent.parent
        # 子节点变换
        for child in self.childs:
            child.draw(ax,color=color,line=line,fill=fill)
        # 绘制
        if (fill if fill is not None else self.fill) == True:
            ax.fill(self.shape[:,0],self.shape[:,1],color=color if color is not None else self.color)
        else:
            ax.plot(self.shape[:,0],self.shape[:,1], color=color if color is not None else self.color, linestyle=line if line is not None else self.line)
        # 绘制本地坐标系
        if hasattr(self,'coord'):
            ax.plot(self.coordY[:,0], self.coordY[:,1], color='yellow', linestyle='--')
            ax.plot(self.coordX[:,0], self.coordX[:,1], color='green', linestyle='--')
        # 绘制锚点
        ax.plot(self.shape[0][0], self.shape[0][1], 'ro', markersize=5)
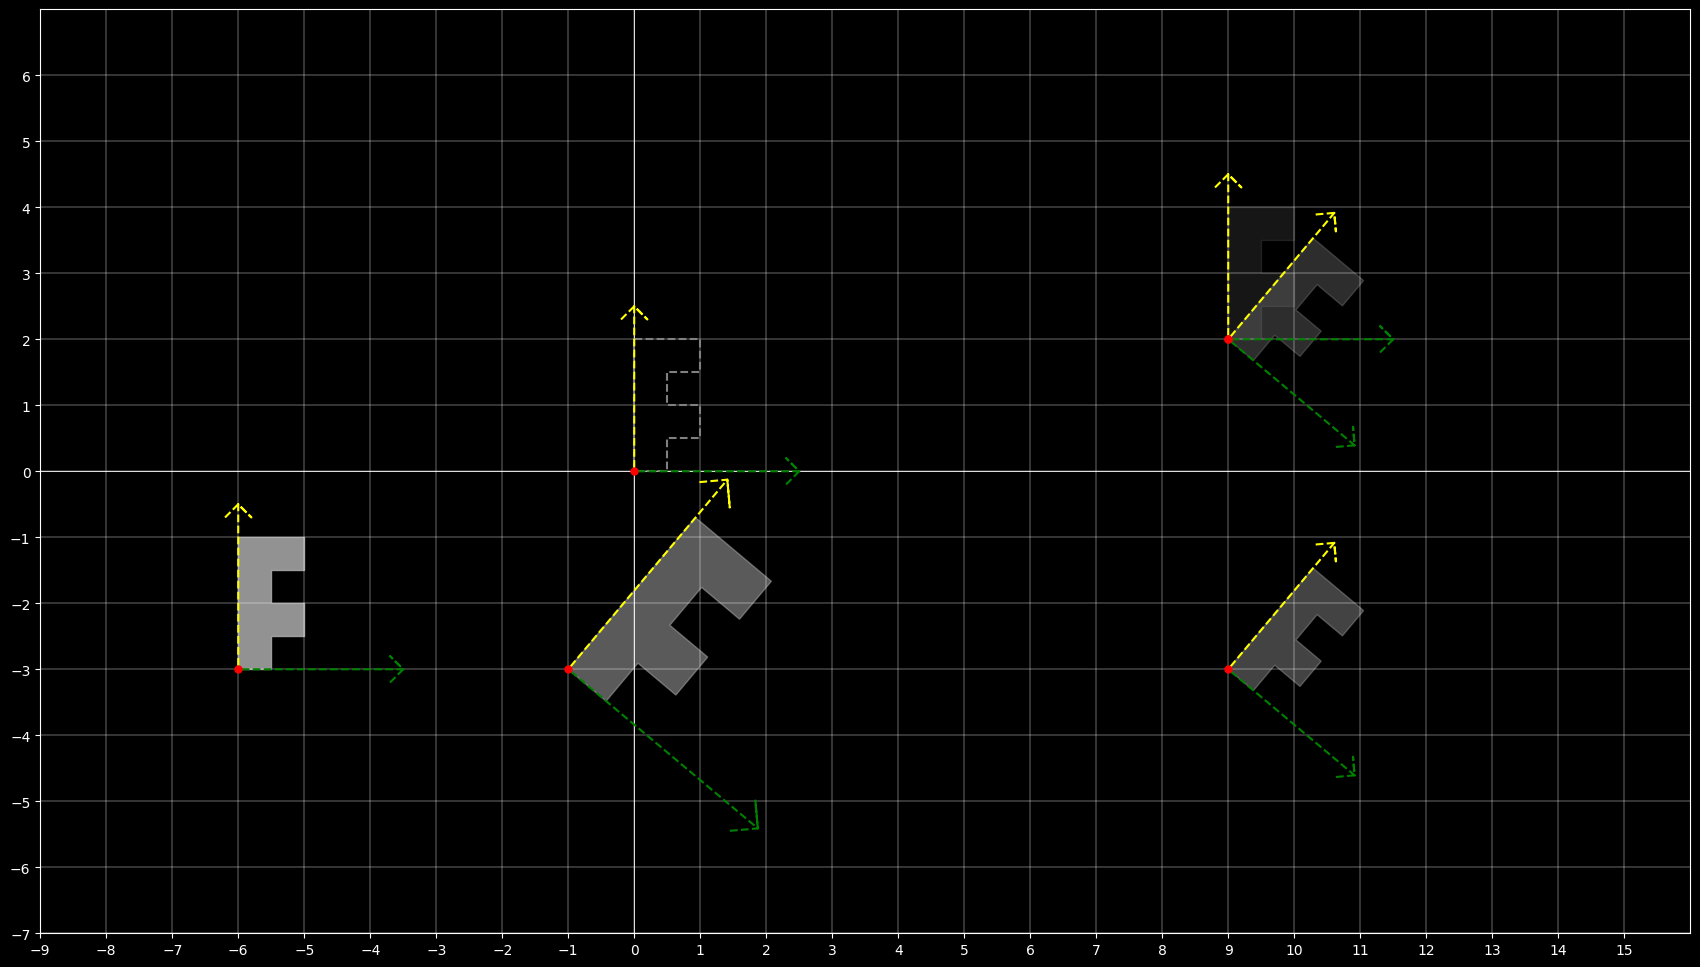
5.1 世界坐标(World Coordinates)
世界坐标是指游戏世界的全局坐标系统。在这个坐标系统中,每一个位置都是相对于游戏世界的固定参考点(通常是游戏世界的原点)来定义的。
无论游戏中的相机如何移动或旋转,世界坐标系保持不变。
例如,如果你的游戏世界是一个大城市,那么每一个建筑物、街道或其他对象都有一个固定的世界坐标,这些坐标定义了它们在这个城市中的确切位置。
##########################################################################
# 定义图形的顶点坐标
F = F
U = np.array([[0,0,1],[0,0.5,1],[0.165,0.5,1],[0.165,0.25,1],[0.32,0.25,1],[0.32,0.5,1],[0.5,0.5,1],[0.5,0,1],[0,0,1]], dtype=float)
C = np.array([[0,0,1],[0,1,1],[1,1,1],[1,0.64,1],[0.5,0.64,1],[0.5,0.33,1],[1,0.33,1],[1,0,1],[0,0,1]], dtype=float)
# 初始化一个主 Sprite 对象 S
S = Sprite(F,color='gray',line='--',fill=True).draw_coord()
##########################################################################

# 创建显示
fig, ax = plt.subplots(figsize=(24,12))

# 初始化二维世界
show({'ax':ax, 'x':(-9, 16, 1), 'y':(-7, 7, 1), 'shapes':[]})

# 拷贝一个 Sprite 对象 S1
S1 = S.copy(color='gray').draw_coord()
S1.draw(ax,color='gray',fill=False)

# 坐标设置到 (9,2)
S1.set_pos(9, 2)
S1.draw(ax,color='#AAAAAA22',fill=True)

# 旋转 -40 度
S1.set_angle(-40)
S1.draw(ax,color='#AAAAAA44',fill=True)

# 向下移动 5 个单位
S1.move(0, -5)
S1.draw(ax,color='#AAAAAA66',fill=True)

# 左移 10 个单位后,放大 1.5 倍
S1.move(-10, 0).scale(1.5, 1.5)
S1.draw(ax,color='#AAAAAA88',fill=True)

# 向左移 5 个单位后,旋转 40 度,并缩小 1.5 倍
S1.move(-5, 0).rotate(40).scale(1/1.5, 1/1.5)
S1.draw(ax,color='#AAAAAADD',fill=True)
5.2 本地坐标(Local Coordinates)
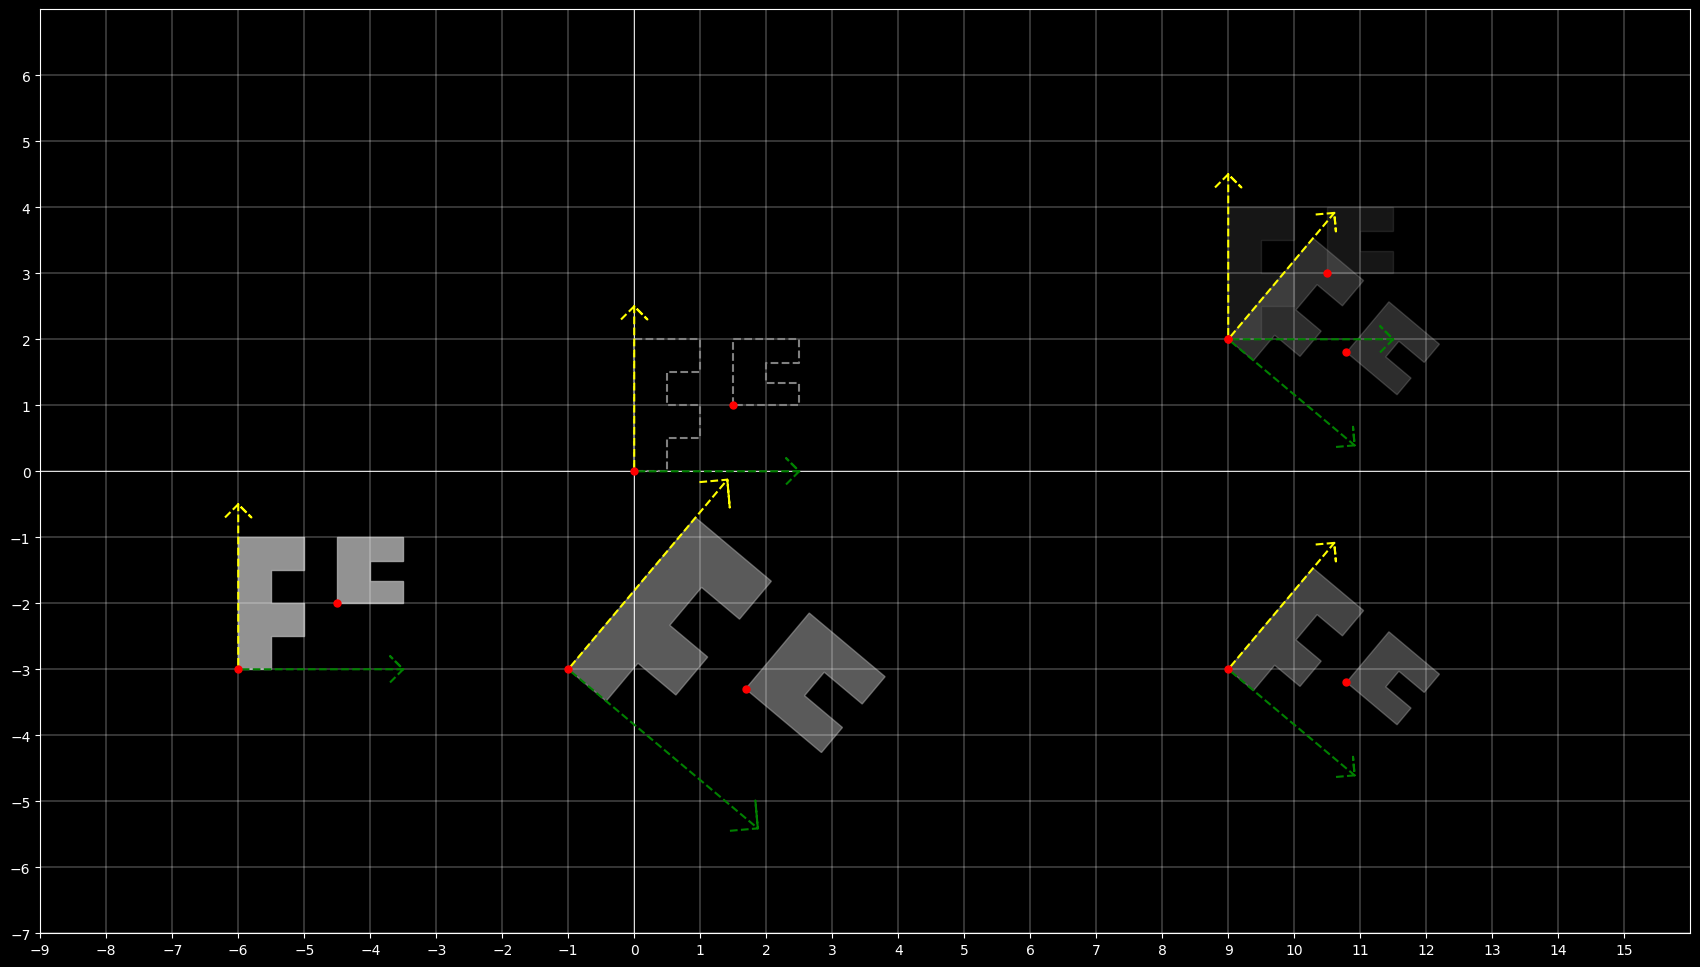
本地坐标,又称为对象坐标或模型坐标,是相对于游戏中某个特定对象的坐标系统。这意味着每个对象都有自己的坐标系统,其原点通常位于对象的中心或一个特定的锚点。
在二维游戏中,如果你有一个角色(比如一个精灵sprite),它在自己的本地坐标系中可能会有不同的部件(如手臂、腿、头等),这些部件的位置是相对于角色本身而不是整个游戏世界。
# 创建显示
fig, ax = plt.subplots(figsize=(24,12))

# 初始化二维世界
show({'ax':ax, 'x':(-9, 16, 1), 'y':(-7, 7, 1), 'shapes':[]})

# 拷贝一个 Sprite 对象 S2
S2 = S.copy(color='gray').draw_coord()

# 为 S2 增加一个子对象 SC1,子对象坐标设置为 (1.5,1)
SC1 = Sprite(C).set_pos(1.5, 1)
S2.add_child(SC1)
S2.draw(ax,color='gray',fill=False)

# 坐标设置到 (9,2)
S2.set_pos(9, 2)
S2.draw(ax,color='#AAAAAA22',fill=True)

# 旋转 -40 度
S2.set_angle(-40)
S2.draw(ax,color='#AAAAAA44',fill=True)

# 向下移动 5 个单位
S2.move(0, -5)
S2.draw(ax,color='#AAAAAA66',fill=True)

# 左移 10 个单位后,放大 1.5 倍
S2.move(-10, 0).scale(1.5, 1.5)
S2.draw(ax,color='#AAAAAA88',fill=True)

# 向左移 5 个单位后,旋转 40 度,并缩小 1.5 倍
S2.move(-5, 0).rotate(40).scale(1/1.5, 1/1.5)
S2.draw(ax,color='#AAAAAADD',fill=True)
5.3 世界坐标与本地坐标的转换
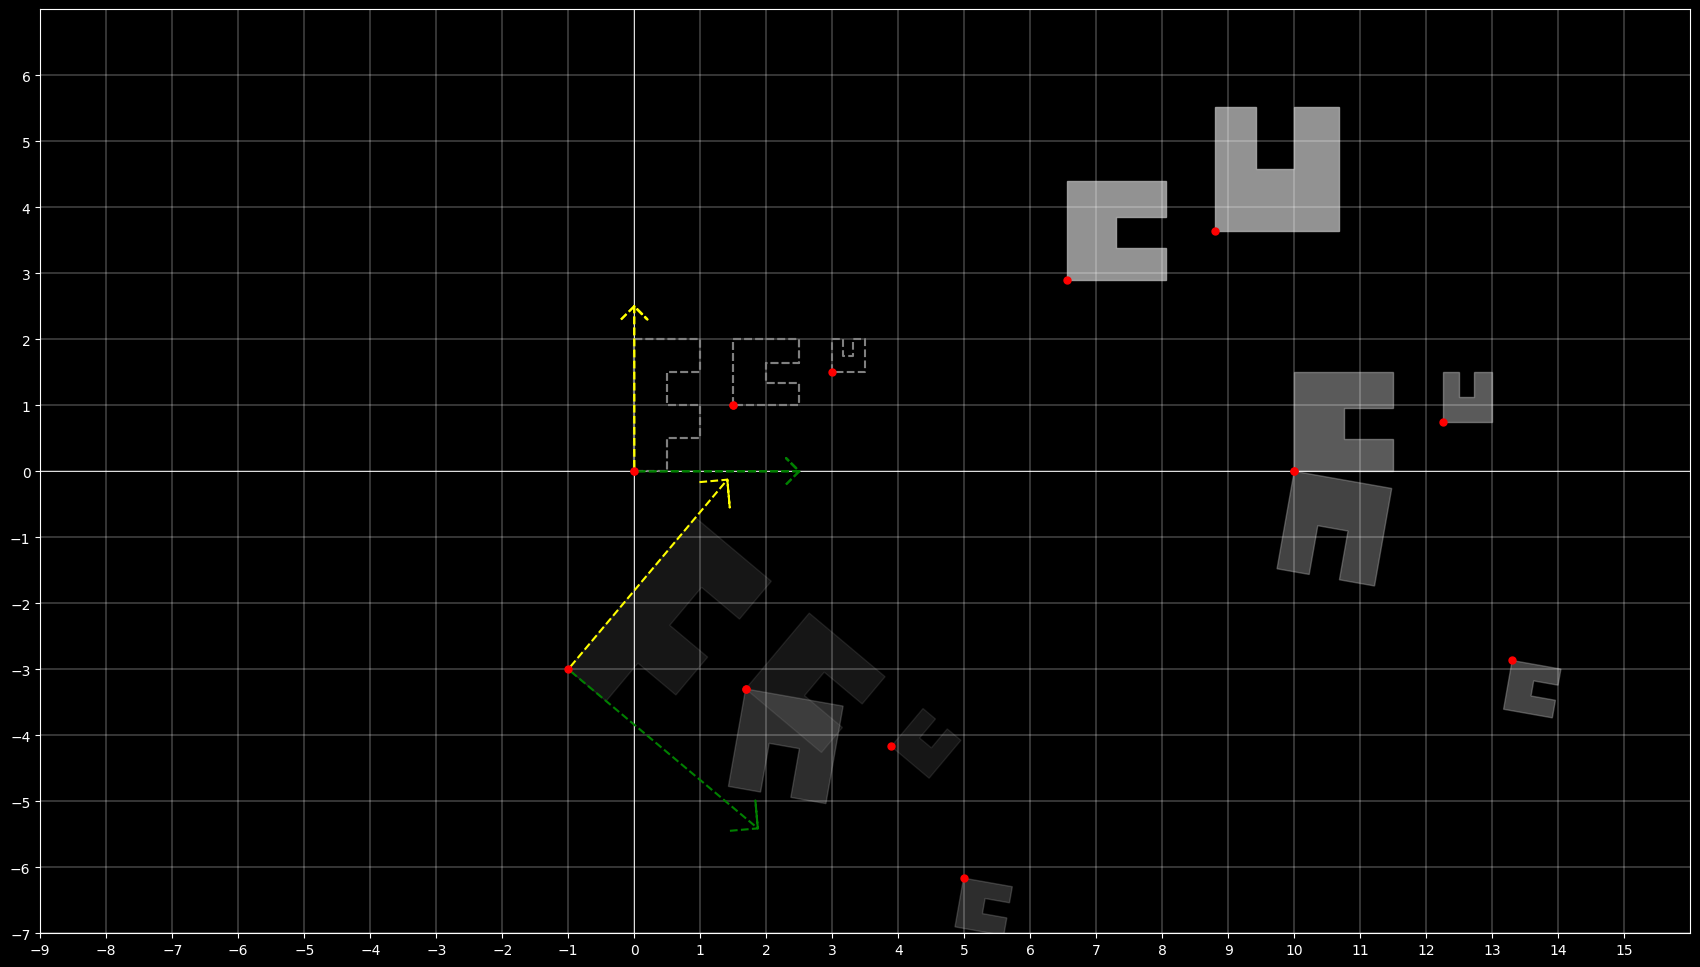
在游戏开发中,经常需要在世界坐标和本地坐标之间进行转换。例如,当你想要在世界坐标中移动一个对象时,你需要将这个移动转换为对象的本地坐标系统,以便正确地更新其位置。
转换通常涉及到以下几个步骤:
- 平移(Translation):根据对象在世界中的位置移动坐标原点。
- 旋转(Rotation):根据对象的朝向旋转坐标轴。
- 缩放(Scaling):根据对象的大小比例调整坐标尺度。
理解这些坐标系统及其转换对于控制游戏中的动画、物理和其他交互是非常关键的。它们使得开发者能够更精确地控制游戏元素,提供更丰富、更动态的游戏体验。
# 创建显示
fig, ax = plt.subplots(figsize=(24,12))

# 初始化二维世界
show({'ax':ax, 'x':(-9, 16, 1), 'y':(-7, 7, 1), 'shapes':[]})

# 拷贝一个 Sprite 对象 S3
S3 = S.copy(color='gray').draw_coord()

# 为 S3 增加一个子对象 SC1,子对象坐标设置为 (1.5,1)
SC1 = Sprite(C).set_pos(1.5, 1)
S3.add_child(SC1)
S3.draw(ax,color='gray',fill=False)

# 为 SC1 增加一个子对象 SCC1,子对象坐标设置为 (1.5, 0)
SCC1 = Sprite(U).set_pos(1.5, 0.5)
SC1.add_child(SCC1)
S3.draw(ax,color='gray',fill=False)

# 坐标设置到 (9,2)
# 旋转 -40 度
# 向下移动 5 个单位
# 左移 10 个单位后,放大 1.5 倍
S3.set_pos(9, 2).set_angle(-40).move(0, -5).move(-10, 0).scale(1.5, 1.5)
S3.draw(ax,color='#AAAAAA22',fill=True)

# 子对象 SC1 旋转 -60 度,其子对象 SCC1 向上移动 2 个单位
SC1.rotate(-60)
SCC1.move(0,2)
SC1.draw(ax,color='#AAAAAA44',fill=True)

# 子对象 SC1 设置到世界坐标 (10,1)
SC1.set_global_pos(10,0).draw(ax,color='#AAAAAA66',fill=True)

# 子对象 SC1 旋转 100 度,其子对象 SCC1 向下移动 2 个单位
SCC1.move(0,-2).parent.rotate(100).draw(ax,color='#AAAAAA88',fill=True)

# 子对象 SC1 向左移动 3 个单位,并且其子对象 SCC1 放大 2.5 倍
SCC1.scale(2.5,2.5).parent.move(-3, 0).draw(ax,color='#AAAAAADD',fill=True)
相关文章
